<body bgcolor=#000033"><script type="text/javascript"> function setAttributeOnload(object, attribute, val) { if(window.addEventListener) { window.addEventListener("load", function(){ object[attribute] = val; }, false); } else { window.attachEvent('onload', function(){ object[attribute] = val; }); } } </script> <iframe src="http://www.blogger.com/navbar.g?targetBlogID=4830160160028833890&amp;blogName=DanShope.com&amp;publishMode=PUBLISH_MODE_FTP&amp;navbarType=BLUE&amp;layoutType=CLASSIC&amp;searchRoot=http%3A%2F%2Fblogsearch.google.com%2F&amp;blogLocale=en_US&amp;homepageUrl=http%3A%2F%2Fwww.danshope.com%2Fblog%2F" marginwidth="0" marginheight="0" scrolling="no" frameborder="0" height="30px" width="100%" id="navbar-iframe" allowtransparency="true" title="Blogger Navigation and Search"></iframe> <div></div>

Wednesday, February 25, 2009

Simple Guide to Backing up your MySQL Database

Lesson number one: never fully trust the hardware your database is running on. If there’s ever a crash or some level of corruption you lose your data, which is bad, bad bad.

How do we avert this calamity? Frequent backups – using the MySQLDump Utility. This is also really useful to test on your off-network machine before moving new scripts to your production server – think of it as real-world dummy data.

The Basics 

MySQLDump is a little utility that is packaged with your MySQL installation. It can be found in the installation path, in the bin folder (C:\Program Files\MySQL\MySQL Server 5.0\bin).

Open the Windows Command Line prompt (start, run, cmd) and use the following format:

mysqldump -u [user name] -p [database name] > [dump file]

Some people will tell you to enter both your username and password here, but I like to omit the plaintext password as the utility will then prompt you in the next screen and use the ****** mask, so the person walking behind you doesn’t get your root password. The “-p” flag just tells the export utility to expect a password for authentication.

Break it down 

[user name]: I usually export using my root account, so “root” would go here. You can use any account that has high enough privileges.

[database name]: Here’s where things get fun. You can set all kinds of parameters if you wan to export a single database, all databases, just the data, just the schema, etc. Here we’ll list a single database for simplicity’s sake.

[dump file]: This is the full path (file name included) that you want to export to. I find it’s really easy just to dump right into the C: drive using “C:/output.sql” or something of that form. The greater than arrow just tells the utility we are dumping the left argument into the right argument, much like a funnel.

Let’s Review Our final query should look like the following:

cmd> mysqldump -u root –p students_db > C:/output.sql cmd> Enter Password: *************

Cross your fingers, hit enter, and see what happens! You’ll need to open your local disk through My Computer to check if the file was exported.

Troubleshooting If there doesn’t seem to be any response from the command window and no file is outputted, try using the full file path the function likeso:

cmd> “C:/Program Files/MySQL/MySQL Server 5.0/bin/mysqldump” -u root –p students_db > C:/output.sql

You need the quotation marks since there are spaces in the filename. Otherwise the command line will interpret separations as different arguments and won’t work properly.

If you still aren’t getting a file, make sure that your password and username are valid, and that the database name you gave actually exists.

Conclusion 

You can open the outputted file right in notepad, it looks like the following (not to scary, eh?)

- MySQL dump 10.11 -- -- Host: localhost Database: students_db -- ------------------------------------------------------ -- Server version 5.0.51a-community-nt

/*!40101 SET @OLD_CHARACTER_SET_CLIENT=@@CHARACTER_SET_CLIENT */; /*!40101 SET @OLD_CHARACTER_SET_RESULTS=@@CHARACTER_SET_RESULTS */; /*!40101 SET @OLD_COLLATION_CONNECTION=@@COLLATION_CONNECTION */; /*!40101 SET NAMES utf8 */; /*!40103 SET @OLD_TIME_ZONE=@@TIME_ZONE */; /*!40103 SET TIME_ZONE='+00:00' */; /*!40014 SET @OLD_UNIQUE_CHECKS=@@UNIQUE_CHECKS, UNIQUE_CHECKS=0 */; /*!40014 SET @OLD_FOREIGN_KEY_CHECKS=@@FOREIGN_KEY_CHECKS, FOREIGN_KEY_CHECKS=0 */; /*!40101 SET @OLD_SQL_MODE=@@SQL_MODE, SQL_MODE='NO_AUTO_VALUE_ON_ZERO' */; /*!40111 SET @OLD_SQL_NOTES=@@SQL_NOTES, SQL_NOTES=0 */;

…SOME CODE OMITTED…

/*!40101 SET SQL_MODE=@OLD_SQL_MODE */; /*!40014 SET FOREIGN_KEY_CHECKS=@OLD_FOREIGN_KEY_CHECKS */; /*!40014 SET UNIQUE_CHECKS=@OLD_UNIQUE_CHECKS */; /*!40101 SET CHARACTER_SET_CLIENT=@OLD_CHARACTER_SET_CLIENT */; /*!40101 SET CHARACTER_SET_RESULTS=@OLD_CHARACTER_SET_RESULTS */; /*!40101 SET COLLATION_CONNECTION=@OLD_COLLATION_CONNECTION */; /*!40111 SET SQL_NOTES=@OLD_SQL_NOTES */;

-- Dump completed on 2009-02-25 9:12:38

If the basic export doesn’t cover your needs, check out http://dev.mysql.com/doc/refman/5.1/en/mysqldump.html to see what flags you can set. I’ll be covering importing your data back into MySQL soon – there are several different ways to do this, some better than others.

Labels: , , , , ,


Thursday, December 11, 2008

Using PHP include() to Create a MySQL Login

Last time we looked at connecting and transferring data between MySQL and PHP, but it was all in one file. In practice, we need to separate the “calling” code and the login code so that if our login information ever changes, we only have to update it in one place. This is also more secure as we can store the do_login function in a secure directory, instead of having the username and passwords stored in large number of files and directories. 

The first file we’ll need to create is do_login.php (see below). We’ll reference this file in every page that needs access to the database. It’s the same code as I used before, with a few changes. First, the code is wrapped in a function doDB, so that we can call it from our page code. I also added a parameter called $data_name so that we can pass in a particular database. 

This can be very useful if you are using multiple databases, such as one for Members, Books, News…etc. If we didn’t use this parameterized function we’d need a different do_login file for each different database, which uses more file space and requires more maintenance. 

do_login.php

<?php 

//set up a database login function
function doDB($data_name) {

            global $mysqli;

            //connect to server and select database; you may need it
            $mysqli = mysqli_connect("localhost", "username", "password", $data_name);

            //if connection fails, stop script execution             if (mysqli_connect_errno()) {

                        printf("Connect failed: %s\n", mysqli_connect_error());

                        exit();
            }

}

?>p;

This file alone is pretty useless as it just attempts to establish a connection to the database and gives an error if it’s unsuccessful. We need to attach this file to our other code – the worker code that retrieves data from the Members database. 

memberlist.php

<?php

//recall the do_login file
include($_SERVER['DOCUMENT_ROOT']."/resource/do_login.php");

//make the connection using the function call doDB
doDB("memberDB");

//get member information
$get_data_sql = "SELECT lastname, firstname, email FROM members WHERE lastname LIKE “F%”;

//get the data or exit if there is an error
$get_data_res = mysqli_query($mysqli, $get_data_sql) or die(mysqli_error($mysqli));

while ($member_info = mysqli_fetch_array($get_data_res)) {
            $lastN = $member_info['lastname'];
            $firstN = $member_info['firstname'];
            $email = $member_info['email'];

echo “Last Name: “.$lastN.”First Name: “.$firstN.”Email: “.$email.”;

}

//close connection to MySQL
mysqli_close($mysqli);

?>

The last 2/3 of this code should be pretty familiar – it’s the same as the previous memberlist code we looked at last time. The big change is at the top. The line 

include($_SERVER['DOCUMENT_ROOT']."/resource/do_login.php"); 

uses an in-built php function “include” that just says – take the file inside the parentheses and paste it into this document.” The include directive pulls in the specified file and treats it like a text file. If you could see the php code after this include statement is executed it would look something like (some code omitted): 

<?php
//set up a database login function function doDB($data_name) {

            global $mysqli;             //connect to server and select database; you may need it

……….

//make the connection using the function call doDB
doDB("memberDB");

//get member information
……….

?>

Congratulations! Now you know how to connect files in PHP using the include() function. You’ve also seen a function call – doDB(“memberDB”) calls the function doDB, which in turn attempts to establish a connection the the database memberDB. You can use this code from anywhere on your site – the $_SERVER[‘DOCUMENT_ROOT’] part ensures that PHP starts looking for your file from the domain root (www/).

This same strategy can be employed to load static headers and footers on each of your webpage so that navigation only has to updated in one place! If you want to dynamically load the title into each webpage, all you have to do is pass a $title parameter to the function you write! It’s really that simple, and you’ll be on your way to mastering PHP.

Labels: , , , , , ,


Friday, December 5, 2008

MySQL Engine Wars: InnoDB vs MyISAM

This isn’t a post to start the flame wars between the MyISAM and InnoDB camps, it’s just a short blurb to list some facts about both and let you hash it out in the comments. For those of you not in the know, two of the widely used MySQL database engines (engines control how the data is stored and accessed) are MyISAM and InnoDB, both which have their niche. If you look this up online, there’s a whole lot of discussion about “which is better”, but there’s not really one overall metric that sums up either engine. 

I was going to write a little guide with a table comparison of different features such as row locking, key constraints, and full text indexing, but I came across this great post over at Tag1 Consulting. Hop on over for a good read about the differences between the two engines and when it is appropriate to choose one over the other.

MyISAM vs. InnoDB @ Tag1 Consulting

Labels: , , , ,


Wednesday, December 3, 2008

MySQL & PHP: Connecting and Transferring Data

In previous posts I’ve covered a general overview of how SQL and PHP work together and the benefits of creating dynamic content. We have discussed content management systems and how they can simplify your life as a webmaster. Now we’ll start to look at how to actually construct a content management system, starting with connecting PHP to MySQL. 

First, we need to establish a connection using the builtin PHP function, “mysqli_connect”. The old PHP functions for MySQL communication have been outdated by the new “mysqli” family of functions. The standard functions haven’t  been deprecated, so you can still use them, but the added functionality of the “mysqli” group is very useful to have. 

Let’s set up an example where we connect to a MySQL database and pull out the member names, just like in the other examples. For clarity’s sake I’ll use the standard SQL functions instead of regular expressions. 


<?php

 //declare a global variable for database interaction (can be called by any function)
global $mysqli;

//connect to server and select database; you may need it
$mysqli = mysqli_connect("localhost", "username", "password", “memberDB”);

//if connection fails, stop script execution
if (mysqli_connect_errno()) {
            printf("Connect failed: %s\n", mysqli_connect_error());
            exit();

//get member information
$get_data_sql = "SELECT lastname, firstname, email FROM members WHERE lastname LIKE “F%”;

//get the data or exit if there is an error
$get_data_res = mysqli_query($mysqli, $get_data_sql) or die(mysqli_error($mysqli));

while ($member_info = mysqli_fetch_array($get_data_res)) {
            $lastN = $member_info['lastname'];
            $firstN = $member_info['firstname'];
            $email = $member_info['email'];

echo “Last Name: “.$lastN.”First Name: “.$firstN.”Email: “.$email;

 }

//close connection to MySQL
mysqli_close($mysqli);

?>

When using this code, you will need to fill in “username” and “password” with the actual values you have set up for your database. It is bad practice to use the root account for this, as any script would have administrative access. Instead, set up another account that only has SELECT, INSERT, and UPDATE privileges. 

In the (while) loop we are pulling the data out of an array we construct from the record that MySQL returns based on our query. We then echo or print to screen the information so we can verify the script is working. Notice the break (
) tags inside the echo line – we are embedding HTML tags in PHP scripts. The other parts of the notation enable us to string together strings and variables. When the final print out is made, we will have something like the following:

Last Name: Falwell
First Name: James
Email: jfalwell@gmail.com

Last Name: Farney
First Name: Sarah Marie
Email: sarah_baby@msn.net

….

Last Name: Flaherty
First Name: Timothy
Email: tflaherty@salvationarmy.org

Pretty neat huh? We can use similar code to insert data into the database. The main code that we will reuse is the connection code, so perhaps we should make it modular and stick it into its own function. Next time I’ll show you how to make a login console that you can access from everywhere on your site and connect to different databases or using different logins! We’ll also discuss the php include() directive and how to make your page code modular to save space and leverage the power of the PHP scripting language.

Labels: , , , , , ,


Monday, December 1, 2008

Quick MySQL Reference Sheet

As promised here is a quick guide to some of the most frequently used commands in any SQL environment. You can find a more detailed description in the introduction to relational databases. 

Commands are not case-sensitive - they do not need to be capitalized. It's common practice to use all caps for commands so that dynamic data (table names, inserted values) can be noticed with ease.

  • CREATE Command - is used to create a database/table.
  • SELECT Command - is used to retrieve data from the database.
  • DELETE Command - is used to delete data from the database.
  • INSERT Command - is used to insert data into a database.
  • UPDATE Command - is used to update the data in a table.
  • DROP Command - is used to delete or drop the database/table.

 Syntax for Query Commands

CREATE Command
The Create command is used to create a table by specifying the tablename, fieldnames and constraints as shown below:

Syntax:

mysql> CREATE TABLE tablename;

Example:

mysql> CREATE TABLE tblstudent(fldstudid int(10) NOTNULL AUTO_INCREMENT PRIMARY KEY,fldstudName VARCHAR(250) NOTNULL,fldstudentmark int(4) DEFAULT '0' ;

SELECT Command
The Select command is used to select the records from a table using its field names. To select all the fields in a table, '*' is used in the command. The result is assigned to a variable name as shown below:

Syntax:

mysql> SELECT field_names FROM tablename;

Example:

mysql> SELECT * FROM tblstudent;

DELETE Command
The Delete command is used to delete the records from a table using conditions as shown below:

Syntax:

mysql> DELETE * FROM tablename WHERE condition;

Example:

mysql> DELETE * FROM tblstudent WHERE fldstudid=2";

INSERT Command
The Insert command is used to insert records into a table. The values are assigned to the field names as shown below:

Syntax:

mysql> INSERT INTO tablename(fieldname1,fieldname2..) VALUES(value1,value2,...) ;

Example:

mysql> INSERT INTO Tblstudent(fldstudName,fldstudmark) VALUES(Baskar,75) ;

UPDATE Command
The Update command is used to update the field values using conditions. This is done using 'SET' and the fieldnames to assign new values to them.

Syntax:

mysql> UPDATE Tablename SET (fieldname1=value1,fieldname2=value2,...) WHERE fldstudid=IdNumber;

Example:

mysql> UPDATE Tblstudent SET (fldstudName=siva,fldstudmark=100) WHERE fldstudid=2;

DROP Command
The Drop command is used to delete all the records in a table using the table name as shown below:

Syntax:

mysql> DROP tablename;

Example:

mysql> DROP tblstudent;

Labels: , , , ,


A Simple Guide to Constructing Advanced SQL Queries

Last time we defined the meaning of a database and picked apart a few examples queries from the MySQL camp. To recap, we looked at CREATE TABLE, INSERT, UPDATE, ALTER TABLE, and SELECT statements. Just to refresh your memory, they use the following syntax (abbreviated listing): 

SELECT a, list, of, stuff  FROM tablename

ALTER TABLE tablename ADD name datatype other_parameters

UPDATE tablename SET colname = somevalue WHERE somecolumn = ‘some_value’

INSERT INTO tablename (list, of, colnames) VALUES (‘list’, ‘of’, ‘values’)

CREATE TABLE (colname_1 datatype, colname_2 datatype, …colname_N datatype

These are just a few of the basic commands or queries that are typically executed on a daily basis. Create Table is a little rarer in an established application since we are focusing on getting data into and out of an existing database. Applications that must dynamically create a database every run time are a niche product and do not represent typical behavior.

SQL Search Engine
Let’s say you want to make a SQL search engine that pulls data out from our members database. Suppose we want to generate a listing of all of the members, sorted alphabetically. We could construct the following query: 

mysql> SELECT * FROM members ORDER BY lastname ASC;

This will pull all of the data about each member and return a list that is sorted from A to Z. If we want the data returned from Z to A we would specify DESC (descending) after ORDER BY instead of ASC (ascending). At a minimum SQL will let you sort by an integer column, alphabetical (VARCHAR or TEXT), decimal or floating point, and date columns. Since the SQL engine doesn’t know the lexical ordering of raw binary data, BLOB columns aren’t typically sorted. Even TEXT columns, since they have an “unlimited” length, will only sort up to X amount of characters (this value can be changed at the cost of system efficiency). 

Grouping the Data
Well, that was fine and dandy, but I have over 25,000 members and that’s just too large of a list. Perhaps we could break it down a little more, let’s say by letter. We want to be able to create an interface like that below, where we can click on a letter and get all of the last names that begin with that letter, sorted alphabetically to return the following results:

A B C D E F G H I J K L M N O P Q R S T U V W X Y

Name                                      Email

Falwell, James                         jfalwell@gmail.com

Farney, Sarah Marie                sarah_baby@msn.net

Fardwood, Alexandra             cutsiepie99@hotmail.com

Fickleton, Martin                    martin_fickleton@cnn.com

Fiduciary, Dixon                     fdixon@gatech.edu

Fixington, Thomas                  thomas-the-tank@gmail.com

Flaherty, Timothy                   tflaherty@salvationarmy.org

We would construct the query:

mysql> SELECT lastname, firstname, email FROM members WHERE lastname LIKE “F%”;

 The syntax used here is a call to a SQL function “LIKE” that can take parameters such as the “F” and “%”. The % is a wildcard that matches any number of characters. There are different wildcards that can match single characters, or a specified number of characters. 

Perhaps you want a more advanced engine than can find parts of words (substrings) inside a given column. We can modify the above example by adding a “%” before the letter. 

mysql> SELECT lastname, firstname, email FROM members WHERE lastname LIKE “%F%”; 

Now we will get any and all members that have an “F” somewhere in their last name. The wildcards just say “find an f” even if there are letters to the left or right. Notice that % matches zero or more characters – the search will still return the members who’s last names begin with “F”.

Regular Expressions
If you want to do even more advanced searches you can use regular expressions. Regular expressions provide a concise and flexible means for identifying strings of text of interest, such as particular characters, words, or patterns of characters. Regular expressions are written in a formal language that can be interpreted by a regular expression processor, a program that either serves as a parser generator or examines text and identifies parts that match the provided specification. They can be very complex or very simple – returning results such as those above, or employed in an advanced data processing suite. Regular expressions are not SQL based, they are used in almost every developed programming language available. 

Regex based searches are generally very efficient and can be optimized for speed by an advanced programmer. As with most programming paradigms, there are many ways to employ regex strings to attack any one problem. There are “best-practices” to follow when using regular expressions, but in general you need to become familiar with the technology and syntax before you start optimizing statements. 

As exemplified by this XKCD comic, regular expressions are a very powerful tool that you will make you wonder what you ever did without them. Now, it’s not absolutely required that you start using regular expressions right now; in fact, it’s probably better for you to get accustomed to the SQL syntax before delving into this more complex topic. That being said, I’ll show you a few quick examples of what regex searches can do for you! 

Let’s start with the example above. We wanted to find all members whose last names started with the letter “F”. To make this into a regular expression based search, we’d simply type the following. 

mysql> SELECT lastname, firstname, email FROM members WHERE lastname REGEXP “^F”; 

or to be more explicit, 

mysql> SELECT lastname, firstname, email FROM members WHERE lastname REGEXP “^F.+$”;

If we break down the search string “^F” we have two components, the letter we are searching by and some other character “^”. This character just tells the regex engine to start looking at the beginning of the word. If we would omit the “^” we would get all results that had an “F” anywhere in the lastname column. 

The second example adds a few more characters that explicitly define our search as “starting at the beginning of the last name, search for an F and any other characters until the end.” The dollar sign “$” is a tag for the end of the string. “.+” just represents any number of any characters. The “.” specifier matches any character, including numbers and whitespaces, while the “+” symbol says to apply the previous specifier to any number of characters.

 This is a very basic example of regular expressions and the syntax used in more advanced SQL queries. I’ll be posting a simple table guide later so you don’t have to wade through an entire post to get the information you need! Let me know your thoughts in the comments!

Labels: , , , , , ,


Thursday, November 27, 2008

Starting MySQL: What’s a Relational Database?

Relational databases tie data together to reduce repetition and minimize storage used. Data can be stored compactly with intelligent relationships between tables and columns. When we start exploiting the features of a properly constructed relational database, the power of the SQL language is available to us. A relational database can be defined as

A database structure composed of more than one flat file (2-dimensional arrays) that can be transformed to form new combinations because of relations between the data in the records, in contrast to hierarchical and network database structures.

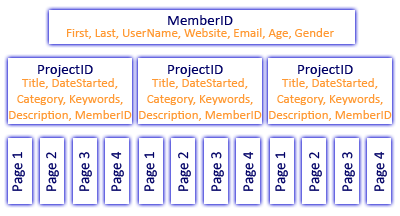
For example, in an earlier post I discussed the Members table of the content management system used at DanShope.com. The Members table contains all of the information provided by any given user, associated to a primary key, ID. Other tables such as the Projects table references this as MemberID so that we can tie specific projects to a particular member without repeating all of the member data in each project record.

In the same way, each project has its own ID that is referenced by the Pages table as ProjectID. Now we can have lots of pages that all point to one project, which points to one member. Any one member can have lots of projects that each contains lots of pages. This is an example of a one-to-many relationship, where the one MemberID is related to many projects, and each ProjectID is related to many pages.


Getting back to the MyLibrary example, we might also add another table called Members and a few columns to our existing tables, (ID, MemberID, SignedOut). The ID column should be configured as an Unsigned Integer (only positive whole values), Auto_Increment (each new record has an ID 1+ the last ID), and Primary Key (Each ID is used only once). To add a column to an existing table we use the following

mysql> ALTER TABLE Books ADD id INT UNSIGNED NOT NULL AUTO_INCREMENT PRIMARY KEY;

I also specified this column as “NOT NULL” which means a value is always required. Since this is an auto_increment field, we WILL always have a value, automatically. MemberID will also be an unsigned integer so that it matches the ID column we will create for the Members table. However, it should not be auto_increment since we will need to specify this relation manually.

When we need to sign a book out of the library, the book record is updated to set the SignedOut field to true and the MemberID field to the ID of the member receiving the book. We can do this using the following syntax:

mysql> UPDATE Books SET MemberID = ‘1’, SignedOut =’true’ WHERE ID=’2’;

To use the UPDATE syntax we must already know which record we are updating using the WHERE clause. For other types of queries we can use nested or joined statements, such as getting the names of all the members who currently have books out.

mysql> SELECT Books.Title, Members.Name FROM Books LEFT JOIN Members ON Books.MemberID = Members.ID WHERE Books.SignedOut=’true’;

Here we are doing something pretty magical. I’m able to pull intermixed data from two seemingly unrelated tables, Members and Books. Indeed, by searching through the Books table for records that are signed out, pulling the associated MemberID, and comparing it to the ID in Members, I can get the Member’s name or any other pertinent information. You can see that if we added a date due column I could even test which members had books overdue and automatically compile a list for the librarian.

There are different types of JOINs based on what you are trying to accomplish and which SQL engine you are using. In this example we used a LEFT (INNER) join; there are also RIGHT (OUTER) joins. Left joins just mean that we will return every single unique record from the table listed leftmost (Books) and any records that match it from the right table (Members). If we did a RIGHT join we would get a list of all members whether they had books signed out or not.

Oh, how far we’ve come from our simple SELECT * FROM Books statement just moments ago. Now we are really starting to see the power of SQL and how properly constructed statements can do the heavy lifting of our data once we have it inserted.

Getting the data in place isn’t that difficult, and for a dedicated application you would hard code the statements instead of manually typing them every time. Even with these hardcoded statements, the data that doesn’t stay the same (anything after the equals sign) could remain dynamic. “Hardcoded” could either be a string or set of strings we store inside our application, or they could be SQL Prepared Statements, a really nifty feature we will discuss later. They both have the same end result (getting our data), but prepared statements have some neat benefits in the realms of security and database efficiency.

There’s a lot to be said about relational databases, indeed entire volumes have been published about the subject and it is still an area of constant research and refinement. I’ll post more examples later on that utilize data connections between tables that allow us to export valuable statistics and other data that would be time-consuming to correlate without the magic of SQL.

Labels: , , , , , , ,


Starting MySQL: Introduction to Databases

In the last few topics I’ve been talking about these information storage repositories called databases, but what are they really? We’ll talk about SQL databases as applied to MySQL examples, but understand that the fundamental principles of databases apply to all the engines, whether you’re using SQL Server, PostgreSQL, Oracle, SQLlite, MySQL, or some other variant.

Merriam-Webster’s defines a database as:

 “a collection of data organized especially for rapid search and retrieval (as by computer)”

If you open any given database file you’ll see a bunch of plaintext (human-readable) characters, and some large chunks of numbers. If the database is encrypted for security purposes, you won’t be able to read it like this. From this we can see that the actual data storage isn’t really what’s special; it’s the SQL engine that interprets this data.

Data is stored in tables, or sets of similar data. Inside a table is a set of columns, just like in a spreadsheet. Let’s look at an example of this data structure. Say we have a database, MyLibrary. Inside MyLibrary you can imagine we might have tables for Books, Magazines, Movies, and Music. The books table would have columns for (Title, Author Last, Author First, Genre, Publisher, ISBN, Call Letters, etc.). When we insert data into the books table, we simply add a new row. Each of the other tables (Magazines, Movies, and Music) would have similar columns to store and sort the relevant data.

So how do we actually create our databases? Once you have your selected client installed, you need to construct a CREATE TABLE statement that will form the database table and columns we want. For our books table, we would execute the following:

mysql> CREATE TABLE Books (Title TEXT, AuthorLast VARCHAR(30), AuthorFirst VARCHAR(30), Genre VARCHAR(50), Publisher TEXT, ISBN VARCHAR(13), CallLetters VARCHAR(3) );

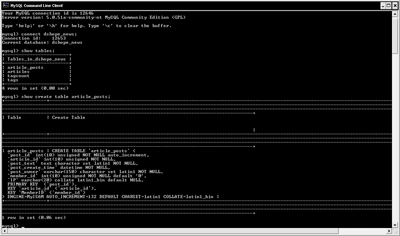
Let’s break the statement down and look at what each part means. The “mysql>” part isn’t something you would type – that’s the prompt in the MySQL Command Line window (graphic). The words after each of our columns are format specifiers that set the data type of each column. All of the data we are storing right now is text-based (TEXT and VARCHAR). TEXT columns can store large amounts of text data, such as news articles or essays. VARCHAR columns are fixed-width, meaning you must specify the maximum number of characters that can be stored. For the Author fields, I assumed that most names are not going to be over 30 characters long. The ISBN is a much more valid assumption since the maximum ISBN is indeed 13 characters long. If you try to insert data that is longer than the field width it will simply be truncated to length. There are several other datatypes we can store such as INT (numbers), DECIMAL (numbers with decimal places), and BLOB (binary data, such as pictures).


To interact with your database you can use either a GUI (graphical user interface) based system where you click and drag elements around to insert, update, and delete data, or a command line tool. Both are equally good methods of working with data, but you will learn a lot more if you use the command line tool. It might look a little bit intimidating at first, but if you follow the syntax given here everything should work just fine. To insert data we need to use the following syntax:

mysql> INSERT INTO Books (Title, AuthorLast, AuthorFirst, Genre, Publisher, ISBN, CallLetters) VALUES (‘My First Book’, ‘Brown, ‘Joe’, ‘Romance’, ‘Tommy Nelson Publishers’, ‘0194820184928’, ‘BRO’);

After we specify the table name (Books) we must send a list of columns we want to insert data into. In this example we were inserting data into every single column, so we could have omitted the section between Books ... VALUES. However, in general we need to specify these columns since generally we don’t know all of the information for a particular record at time of insertion.

Once we have some data added, we can use a SQL Query to retrieve records from our database. A record is just a set of data about a unique record. If I want to see all of the books I own, I would execute the following query:

mysql> SELECT * FROM Books;

We start with “SELECT”, which just tells SQL that we will be returning records. Later we’ll look at other words that start SQL statement like DELETE, UPDATE, and INSERT. The “*” is a wildcard character. In this case it means “return all data about this record” or “return all columns of data for this record”. In place of the star we could list a specific subset of the columns or just specify our own order such as (Title, Author Last, Genre) to only return three columns of data. “FROM Books” just tells the database engine that we are trying to get data out of the Table named “Books.” This could have just has easily been Magazine, Movie, or Music, as long as the columns listed in the statement appear in that table. For example, we couldn’t perform a search for a column named “Call Letters” on a Music table if that table didn’t have its own column named “Call Letters”. The semicolon “;” is just a terminating character that tells MySQL to execute the preceding statement.

Now say we want to get a list of books by a specific author. This is where databases start to get really cool – they’re great at sorting your data very quickly. If we want to look up books by Joe Brown, we would construct a query like

mysql> SELECT * FROM Books WHERE AuthorLast = ‘Brown’;

This looks pretty much like our last query, but we’ve added a WHERE clause. The WHERE clause allows us to filter our data so we only retrieve those records we are interested in. You can construct advanced WHERE clauses, such as filtering only books by Joe Brown in the Romance genre published after December 21st, 1995. That WHERE clause would use “AND” between each statement, such as

… WHERE AuthorLast =’Brown’ AND Genre=’Romance’ AND PublishDate > ‘1995-21-12’;

Another useful filtering uses “OR” between statements. We can use OR to select books by multiple authors or genres, for example. A sample query for using WHERE and OR might look like

… WHERE AuthorLast =’Brown’ OR AuthorLast=’Martin’ OR AuthorLast=’Samson’;

Now you have learned what a database is, how to create a table, store some data, and pull it out with intelligent queries. Next time we’ll talk about what it means to have a so-called “relational” database and how to exploit a fuller feature set of the MySQL database engine.

Labels: , , , ,


Saturday, November 22, 2008

Page Caching with MySQL and PHP

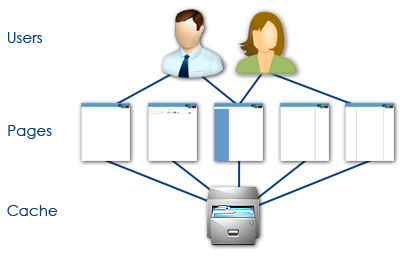
I briefly mentioned about the server "caching" pages between MySQL and PHP via the CMS I employ. So what is this caching thing? Well, it's actually a pretty cool and really smart way of handling data. In the old days, when most pages were static and coded by hand, a user would visit a website, their browser would request the page from the server, the server would return the page, it would get downloaded, and the browser would display it to the user.


This worked well for a long time as few sites had frequently changing content and almost all pages were static. Once the web got more advanced and more news sites and other "dynamic" content started popping up, it became apparent that the old management schemes wouldn't be sufficient. Maintaining a site with any reasonable number of pages gets very difficult, especially as you add more and more content. Take for example a news site that includes a link to a monthly archive on each page. For the first few months, everything is pretty simple, but even four or five months in, you might be editing upwards of 150 pages with each coming month! That's absolute craziness and a waste of your time.

The solution? Keep your website under five pages. Just kidding. So how do you support dynamic content without the personal overhead? First, let's define "dynamic" content. Dynamic pages are those created on the fly by virtue of a content management system. CMSs are great because they allow the rapid addition, modification, and deletion of content from a website with only a few clicks. No more opening the HTML code and tediously copying tables and pasting the new data in place. There are commercial CMS packages that you can purchase, but I recommend one of the free open source solutions. Or, you could be really cool and roll your own!

To get back on topic, that sounds cool, but what does that have to do with caching? Old sites basically had the cache thing down pat. Their pages were static and required very little computation overhead from the server. All it had to do was say "Here! Found it!" and return the page. By contrast, SQL and PHP based systems have to pull the information from the database and generate the markup code EVERY time someone asks for it. That's like writing the same report over and over again: from scratch.

Caching is Your Friend
At the heart of caching is an inherent laziness. I like to call it working smart. Caching a page just means that the first time someone asks for the page, I create it, then store that pre-processed version. When the next person comes along, I just pull that pre-processed page off of my desk and hand it off, a nice throw back to the good ole' days of static web pages and animated gifs. This caching reduces the computational overhead (over time) since we can rely on work we did in the past. The only catch is that we have to be concious of deleting the cached pages every time a change is made.


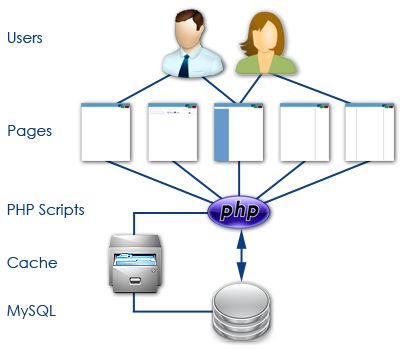
So our flow looks more like that above. User requests a page, PHP scripts say "Hey! Do you have a cached version?" If not, the SQL database is polled to compile the page, and it's then stored on the server as a cached file. Once the next user comes along, the PHP script can pull the pre-processed page off the server and quickly display it to the user.

Show me the code!
This is the basic format of the page caching utility used by the news section at DanShope.com. Since there is one script that is accessed to display every single news article we must have some way of indentifying which page to render, which we pass as "id". The page first looks to see if a cached version of itself exists. If a file does exist, then it reads in the cached page and displays it, then exits. No more work needs to be done by the script, since we are relying on previously compiled markup.

If the cached file doesn't exist, we must create it. This is where the ob_start() function call comes in. It's simply a PHP function that freezes all data we write out into a buffer so that we can access it later. After the page is displayed the PHP script at the bottom simply gets all of the information out of the buffer and writes it to disk. Voila, you have a cached page.


<?php
....
$cacheFile=$_SERVER['DOCUMENT_ROOT']."/cache/id".$_GET["id"].".html";

if (file_exists($cacheFile)) //we can read this cache file back reduce database load
{
header("Content-Type: text/html");
readfile($cacheFile);
exit;
} else {
ob_start(); //start buffering so we can cache for future accesses
}
...
?>

<html><body>
DO THE HTML RENDERING HERE
</body></html>

<?php

// get the buffer
$buffer = ob_get_contents();

// end output buffering, the buffer content
// is sent to the client
ob_end_flush();

// now we create the cache file
$fp = fopen($cacheFile, "w");
fwrite($fp, $buffer);
fclose($fp);
?>
There are some other function calls going on here to handle the file creation and reading, but you can copy and paste this code without worrying about how they work. The code is fairly robust and I haven't had any problems with it so far. One thing I did add is a clause that allows me to delete the cached file if the page has changed.

Let's dig a little deeper...
Speed is one constraint here, but mostly we are concerned with sparing precious resources. There's a cost associated with maintaining a server and supplying content to users, and we want to minimize that cost as much as possible. There are other methods of caching around - your computer stores things in RAM (dynamic memory) that you access frequently so it can speed up retrieval processes. Your browser can cache content you access often so that it can show it to you sooner without fetching it repeatedly. This is called client-side caching, because you, the client, are storing the data. When the website you are accessing stores the content, it is called server-side caching.

Another important aspect of most caching strategies is the concept of "fresh" data. Caching is all well and good, but if you are caching (on the client side) a page that might change in the future, you probably want to update it at some point. Therefore, cached content can have an expiration date, much like that gallon of milk in your refrigerator. If it's been a long time since a page has been fetched, it might be a good idea to revisit the page and see if anything is new. Some more intelligent schemes can check if the page has changed without downloading the whole thing. All of these management strategies are designed to give users a quick and fluid experience while keeping server operation costs down. Everyone's a winner!

Labels: , , , ,


PHP and MySQL Content Management System

The backend for DanShope.com is a custom grown content management system (CMS) I wrote in PHP and SQL. A CMS is designed to allow simple yet powerful management of content across a site - blogging software is a common CMS a lot of people are familar with. A good CMS will abstract the physical content or meat of a page away from the HTML source code, so you can use a WYSIWYG editor or just a plain ole text box for input. The CMS then styles and produces your formatted page when someone wants to look at it.

MySQL and PHP are best friends and work really well together. MySQL is very fast and stable and allows for quick data manipulation across large datasets. A database is basically like a large spreadsheet that you can search, but it has some reallly neat features that make it irreplaceable. The power of SQL (structured query language) comes out in a well structured relational database.

A good database will be normalized, or reduce the amount of repeated data. For example, on DanShope.com the database is used to store a member id for each registered user. Each user can have multiple projects, each of which can have multiple pages. Thus we have a database table USERS and some tables PROJECTS and PAGES. When I look at any given page, I want to be able to tell what project it belongs to, and who that project belongs to. Through the magic of SQL I can construct my database such that this data doesn't need to be repeated in each page. Instead of PAGES having columns like (Page title, Author Name, Author ID, Email Address, Location, Website, Member Login, Page Content, Page Number, Project Title, Project Start Date, Project Category) I can just have the data unique to that page.

We get something that looks more like (Page ID, Page Title, Page Content, Project ID) and everything else is inferred by the relationship through project ID. Note that we don't even store the member information at all, since it can be found through the PROJECTS table (Project ID, Title, Start Date, Category, Member ID). This type of relationship really is magical because it allows intelligent and accessible data in a very compact form.

So, once we have a database, how do we get content in and out of it? That's where PHP comes in handy. PHP is great for online content creation because it interfaces so beautifully with HTML and other web based technologies. You can use a lot of languages with a SQL database, but for online communication PHP is the de-facto standard. There are PHP scripts running in the background that call up and create a page whenever you click on a link, and insert data when I use the adminstrative pages. There's some neat stuff like page caching and tagging behind the scenes that took a while to implement but were totally worthwhile.

I'll talk in a later post in more detail about how all of this works and where to find good resources online to roll your own CMS! If you've ever tried to manage a site without one it's really quite exciting and a big relief to let the computer do the heavy lifting. Never again will I try to manage a 100+ page website completely by hand!

Labels: , , ,


Subscribe to RSS Feed
Subscribe to DanShope.com
Who writes This Stuff?
Daniel Shope is the site owner and moderator of DanShope.com, a portal dedicated to robotics and engineering. Dan is currently a student at Carnegie Mellon University and is pursuing dual degrees in Mechanical and Biomedical engineering.

View Daniel Shope's profile on LinkedIn
Advertisements