<body bgcolor=#000033"><script type="text/javascript"> function setAttributeOnload(object, attribute, val) { if(window.addEventListener) { window.addEventListener("load", function(){ object[attribute] = val; }, false); } else { window.attachEvent('onload', function(){ object[attribute] = val; }); } } </script> <iframe src="http://www.blogger.com/navbar.g?targetBlogID=4830160160028833890&amp;blogName=DanShope.com&amp;publishMode=PUBLISH_MODE_FTP&amp;navbarType=BLUE&amp;layoutType=CLASSIC&amp;homepageUrl=http%3A%2F%2Fwww.danshope.com%2Fblog%2F&amp;blogLocale=en_US&amp;searchRoot=http%3A%2F%2Fblogsearch.google.com%2F" marginwidth="0" marginheight="0" scrolling="no" frameborder="0" height="30px" width="100%" id="navbar-iframe" title="Blogger Navigation and Search"></iframe> <div></div>

Sunday, November 30, 2008

SolidWorks Lesson 1.4: Sweeps, Assemblies, & Mates (Yo-Yo String)

Last time we created a yo-yo body and learned how to use rotational extrusions and mirrored sketches.  In this lesson we'll learn how sweeps work, start using assemblies, and learn about the SolidWorks assembly attachments called "mates". At the end we'll have a functional yo-yo...well, sort of! Let's get started!

  1. Create a new document, and choose the Right plane to start your sketch.


  2. Draw a horizontal straight line about 2” long (start at the origin)
  3. Select the spline tool. Click on the end of your last line, and draw a loop.
    1. You may need to play around with this a little since you don’t want your loop to overlap itself at all
    2. We need smooth curvature, so be sure not to make any “sharp” bends


  4. Now selecting the Front plane, start a new sketch. You will need to rotate the view manually either by clicking with the center mouse wheel and dragging across the window, or by using the standard view buttons.
  5. Select the circle tool and sketch a small circle at the origin.
    1. If you created the other lines properly, this should be centered on the straight line.
  6. Dimension this circle with a 0.0625” (1/16”) diameter using the “smart dimensions” tool.


  7. Now click the Sweep/Swept feature button on the Features Toolbar.


  8. Your profile is the circle; your path is the line.
    1. You might see how this could be useful for making complex paths
    2. Feel free to play with this feature when you have some free time!


  9. If you get an error message and SW doesn’t let you create the sweep, there might be something wrong with your model.
    1. Make sure that the circle we are “sweeping” over the long profile is significantly smaller than the line. If the 3D solid will intersect itself because the loop is too small or the circle too large, SW will give you an error message
    2. There may be a sharp angle between the straight line and the loop. To fix this, simply apply a large sketch fillet to the first sketch, say, ½ to 1” radius.
  10. If you went through the yo-yo tutorial, you should now we have a yo-yo string and a body, but they’re in separate documents. We create a SolidWorks assembly document to put our pieces together.


  11. Create a new Assembly document (File, New, Assembly).
  12. Using the “Insert Components” dialog (replaces the property manager), select your yo-yo body or using the browse dialog locate and insert this.
    1. The first part you insert into an assembly will be the “origin”. If you delete this origin part and insert parts later, the assembly will NOT be constrained in 3D space, a big problem for FEA or any physical simulations.
  13. We will use the concept of mates—creating relationships between the parts using the geometry we have created.
    1. For this step we will use a less-useful mate, the “tangent” mate to fix our string to the inner radius of the yoyo.
  14. Not completely constrained, but it will work for this non-functional model (prop)
  15. Your yo-yo is complete!

Labels: , , , , , ,


Saturday, November 29, 2008

The 8 Step Guide to Starting & Marketing Your Website

Perhaps you've been browsing the web lately and thought about starting your own site. You might have something you want to share with the world, or just want to show off your work. There's also the lucrative prospect of marketing your product via the web. A lot of beginner's guides out there only talk about how to pick out a website template and neglect to tell you about how to market your site and scams to watch out for. The 8 step guide is designed to get your site a good footing and help you build on this solid foundation. Post any remaining questions in the comments!

  1. Set a Clear Goal.
    The first order of business is having a clear goal for your site. Who is your target audience, and what are you trying to "sell" to them? Whether you're actually selling a product or not, you are marketing your site to build up readership. If you don't offer something of value to your customers, they won't have a reason to come back. Try to find compelling content that is in line with your company or focus and that your viewers will appreciate.

  2. Custom or Pre-fabbed?
    Once you have a focus for your site, you'll want to start thinking about how you will present this content to your viewers. Should you get your own domain (web address) and start from scratch, or would blogging software (Blogger, WordPress, MoveableType, LiveJournal, Xanga) better suit your needs? Blogs are great because you can be up and running literally in minutes. A custom site takes more work but can be very rewarding in the long term. No matter what course you decide to take, make sure that you can supply your site with the time and care it needs to maintain fresh content and get recognized by search engines.

    If you're going the custom route, you will need both a domain name and hosting. The domain name should be a (.com,.org,.edu,.biz) based on your needs. In my experience it's best to start with a .COM unless you are an organization, in which case .ORG will resonate with your viewers better. Most people will try .COM by default if they forget the full website address, so it might be good to have this domain registered anyway. Hosting just means where your pages will be stored and people can access them from. Potential viewers will type in your website address, get pointed to your domain, and a page request will be made. There's a lot of mixed reviews out there, but some good companies for both hosting and domain purchasing are GoDaddy.com, IPower.com, and Register.com.

  3. Research SEO.
    Before you open your site do some research on SEO or Search Engine Optimization. SEO is a science in its own right; trying to figure out how the big search engines work is a full time job. Luckily for you numerous companies, such as HubSpot.com and PepperJam, have sprung up in recent years and specialize in this topic. You can rely on their expertise to fashion your website into a robust marketing tool. You can also find books at your local library or book retailer focused on SEO. These can be an invaluable resource in marketing your website to the masses.

  4. Designing your site.
    If you're starting a custom site it might be useful to hire a graphics designer or find someone with an art and publications background. You want to organize your layouts in a manner that is optimized for the content that is the most important to your viewers. Later we'll discuss in more detail how to determine the optimal layout for your site based on your long term goals.

    A great way to start thinking about your site's design is to keep a list of websites that you like in terms of style and layout. Start constructing a color palette that will compose your site. You can hand these to your designer to help streamline the design process. If you're doing the work yourself, you'll have some choice references to work from. I even like to take screenshots of the sites I like and keep a folder of designs styled to my liking. When I need to do a new layout or refresh the site's look, I'll pull out my portfolio of resources which saves a lot of time and doesn't require me to revisit the sites. This is especially helpful if the site's layout changes in the meantime, or if the site becomes unavailable.

  5. Creating your site layout.
    Once you've determined the niche your site will fulfill, and have an idea of the colors and some graphics you like, you are ready to optimize your page layout(s). Start by listing the different elements of your site for a given page. You might have a list like the following:

    Logo
    News & Updates
    Testimonials/Quotes
    Banner Ad
    Weekly Blurb
    Blog Posts
    Footer

    You should rank these by importance and give each a weight (out of 100%). Do a little research about what users look at on websites. A great study is eye-gaze tracking, which is widely used by marketers to create better targeted layouts. I could try to give you the perfect recipe here, but the fact is layouts can be different for every site and you should expect to do some research when creating your site. Website design and maintenance is a time-consuming but fun process that will pay off in the end. The next phase is called "wire-framing" where you create box layouts for each element of your site we listed above. The placement of these boxes should be determined by the ranking you set for each of your elements. Read this great article about wire framing pages and creating site flowcharts. If you're looking for something more radical, this article from Usability Post has some great graphics examples and a guide to "breaking out of the box." There are other great, comprehensive guides out there, just do a search for "how to start a website" or "creating my website".

  6. Bringing the Design to Life.
    Now that you have your website design, you'll want to start building the code behind your site. The designer should have a solid understanding of HTML, CSS, Javascript, and PHP, CGI, SQL for more advanced dynamically driven sites. If you're using blogging software, consult the documentation for your particular vendor. You can find well-designed templates online or design your own, but you must use the proper markup for your vendor.

  7. Testing and Validation.
    Before you put your site online, TEST TEST TEST. Test it from all the major browsers (Internet Explorer 6/7/8, Firefox, Safari, Opera) as well as clicking on all the links to make sure they work. If you are using forms on your site, walk through the entire process of submitting a form. If users are signing up for accounts, make sure you have code that tests against duplicate usernames and invalid passwords, or expired validation links if you're sending out confirmation emails. When your site goes live, everything should "just work." Remember that whole thing about first impressions? Yep, it applies here big time. Don't rely on your visitors coming back if they have a bad experience the first time around. In fact, studies have shown that users browsing the web make a decision on any given site (whether to stay or go) within seconds of loading.

  8. Marketing your website.
    The worst thing you could do at this point is forget to market your website. No, I'm not talking about spending thousands of dollars on your local radio station ads, or doing some fancy-schmancy TV ad. Those are all well and good but there are some much easier and less-costly ways to get your site noticed. One of the best things you can do is social networking. This buzz word just means get out and establish an online identity that people will recognize. Get on Facebook, LinkedIn, ZoomInfo, StumbleUpon, Digg, Delicious, and all those other Web 2.0 sites and start posting. Now, DON'T do link spamming or any other nefarious method of getting links to your site. The point here is to intrigue people enough about "who is this guy?" that they go to your profile and click on the link to your site. Also, people WILL start to notice frequent posters across various domains. Just be sure not to give out any personally identifiable information as ID theft is a real issue here.

    Be wary of linking schemes and sites that advertise "google-bombing" and other means to instantly propel your site to the top of the search ranks. The truth is getting your site recognized takes time, but the legitimate links you establish will outlast and out value any artificially elevated search engine trickery. Also, you risk removal from Google's index if you are found to participate in these schemes.

Conclusion
So let's recap! You should find a focus or niche for your site, design what type of hosting you want to use, and go about designing your website in a way that will be robust and extensible in the future. Once you have your design on paper, start turning it into useable markup language and test it out on a secure area of your site. Once you're ready, publish your site and start marketing! You're on the way to success.

Update: I just read a great post from ProBlogger about starting out your blog with great content and how to market yourself. Head on over to ProBlogger for a useful read!

Labels: , , ,


Thursday, November 27, 2008

Starting MySQL: What’s a Relational Database?

Relational databases tie data together to reduce repetition and minimize storage used. Data can be stored compactly with intelligent relationships between tables and columns. When we start exploiting the features of a properly constructed relational database, the power of the SQL language is available to us. A relational database can be defined as

A database structure composed of more than one flat file (2-dimensional arrays) that can be transformed to form new combinations because of relations between the data in the records, in contrast to hierarchical and network database structures.

For example, in an earlier post I discussed the Members table of the content management system used at DanShope.com. The Members table contains all of the information provided by any given user, associated to a primary key, ID. Other tables such as the Projects table references this as MemberID so that we can tie specific projects to a particular member without repeating all of the member data in each project record.

In the same way, each project has its own ID that is referenced by the Pages table as ProjectID. Now we can have lots of pages that all point to one project, which points to one member. Any one member can have lots of projects that each contains lots of pages. This is an example of a one-to-many relationship, where the one MemberID is related to many projects, and each ProjectID is related to many pages.


Getting back to the MyLibrary example, we might also add another table called Members and a few columns to our existing tables, (ID, MemberID, SignedOut). The ID column should be configured as an Unsigned Integer (only positive whole values), Auto_Increment (each new record has an ID 1+ the last ID), and Primary Key (Each ID is used only once). To add a column to an existing table we use the following

mysql> ALTER TABLE Books ADD id INT UNSIGNED NOT NULL AUTO_INCREMENT PRIMARY KEY;

I also specified this column as “NOT NULL” which means a value is always required. Since this is an auto_increment field, we WILL always have a value, automatically. MemberID will also be an unsigned integer so that it matches the ID column we will create for the Members table. However, it should not be auto_increment since we will need to specify this relation manually.

When we need to sign a book out of the library, the book record is updated to set the SignedOut field to true and the MemberID field to the ID of the member receiving the book. We can do this using the following syntax:

mysql> UPDATE Books SET MemberID = ‘1’, SignedOut =’true’ WHERE ID=’2’;

To use the UPDATE syntax we must already know which record we are updating using the WHERE clause. For other types of queries we can use nested or joined statements, such as getting the names of all the members who currently have books out.

mysql> SELECT Books.Title, Members.Name FROM Books LEFT JOIN Members ON Books.MemberID = Members.ID WHERE Books.SignedOut=’true’;

Here we are doing something pretty magical. I’m able to pull intermixed data from two seemingly unrelated tables, Members and Books. Indeed, by searching through the Books table for records that are signed out, pulling the associated MemberID, and comparing it to the ID in Members, I can get the Member’s name or any other pertinent information. You can see that if we added a date due column I could even test which members had books overdue and automatically compile a list for the librarian.

There are different types of JOINs based on what you are trying to accomplish and which SQL engine you are using. In this example we used a LEFT (INNER) join; there are also RIGHT (OUTER) joins. Left joins just mean that we will return every single unique record from the table listed leftmost (Books) and any records that match it from the right table (Members). If we did a RIGHT join we would get a list of all members whether they had books signed out or not.

Oh, how far we’ve come from our simple SELECT * FROM Books statement just moments ago. Now we are really starting to see the power of SQL and how properly constructed statements can do the heavy lifting of our data once we have it inserted.

Getting the data in place isn’t that difficult, and for a dedicated application you would hard code the statements instead of manually typing them every time. Even with these hardcoded statements, the data that doesn’t stay the same (anything after the equals sign) could remain dynamic. “Hardcoded” could either be a string or set of strings we store inside our application, or they could be SQL Prepared Statements, a really nifty feature we will discuss later. They both have the same end result (getting our data), but prepared statements have some neat benefits in the realms of security and database efficiency.

There’s a lot to be said about relational databases, indeed entire volumes have been published about the subject and it is still an area of constant research and refinement. I’ll post more examples later on that utilize data connections between tables that allow us to export valuable statistics and other data that would be time-consuming to correlate without the magic of SQL.

Labels: , , , , , , ,


Starting MySQL: Introduction to Databases

In the last few topics I’ve been talking about these information storage repositories called databases, but what are they really? We’ll talk about SQL databases as applied to MySQL examples, but understand that the fundamental principles of databases apply to all the engines, whether you’re using SQL Server, PostgreSQL, Oracle, SQLlite, MySQL, or some other variant.

Merriam-Webster’s defines a database as:

 “a collection of data organized especially for rapid search and retrieval (as by computer)”

If you open any given database file you’ll see a bunch of plaintext (human-readable) characters, and some large chunks of numbers. If the database is encrypted for security purposes, you won’t be able to read it like this. From this we can see that the actual data storage isn’t really what’s special; it’s the SQL engine that interprets this data.

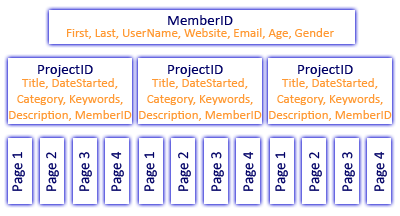
Data is stored in tables, or sets of similar data. Inside a table is a set of columns, just like in a spreadsheet. Let’s look at an example of this data structure. Say we have a database, MyLibrary. Inside MyLibrary you can imagine we might have tables for Books, Magazines, Movies, and Music. The books table would have columns for (Title, Author Last, Author First, Genre, Publisher, ISBN, Call Letters, etc.). When we insert data into the books table, we simply add a new row. Each of the other tables (Magazines, Movies, and Music) would have similar columns to store and sort the relevant data.

So how do we actually create our databases? Once you have your selected client installed, you need to construct a CREATE TABLE statement that will form the database table and columns we want. For our books table, we would execute the following:

mysql> CREATE TABLE Books (Title TEXT, AuthorLast VARCHAR(30), AuthorFirst VARCHAR(30), Genre VARCHAR(50), Publisher TEXT, ISBN VARCHAR(13), CallLetters VARCHAR(3) );

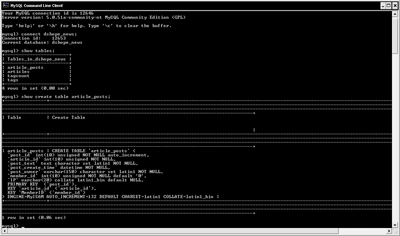
Let’s break the statement down and look at what each part means. The “mysql>” part isn’t something you would type – that’s the prompt in the MySQL Command Line window (graphic). The words after each of our columns are format specifiers that set the data type of each column. All of the data we are storing right now is text-based (TEXT and VARCHAR). TEXT columns can store large amounts of text data, such as news articles or essays. VARCHAR columns are fixed-width, meaning you must specify the maximum number of characters that can be stored. For the Author fields, I assumed that most names are not going to be over 30 characters long. The ISBN is a much more valid assumption since the maximum ISBN is indeed 13 characters long. If you try to insert data that is longer than the field width it will simply be truncated to length. There are several other datatypes we can store such as INT (numbers), DECIMAL (numbers with decimal places), and BLOB (binary data, such as pictures).


To interact with your database you can use either a GUI (graphical user interface) based system where you click and drag elements around to insert, update, and delete data, or a command line tool. Both are equally good methods of working with data, but you will learn a lot more if you use the command line tool. It might look a little bit intimidating at first, but if you follow the syntax given here everything should work just fine. To insert data we need to use the following syntax:

mysql> INSERT INTO Books (Title, AuthorLast, AuthorFirst, Genre, Publisher, ISBN, CallLetters) VALUES (‘My First Book’, ‘Brown, ‘Joe’, ‘Romance’, ‘Tommy Nelson Publishers’, ‘0194820184928’, ‘BRO’);

After we specify the table name (Books) we must send a list of columns we want to insert data into. In this example we were inserting data into every single column, so we could have omitted the section between Books ... VALUES. However, in general we need to specify these columns since generally we don’t know all of the information for a particular record at time of insertion.

Once we have some data added, we can use a SQL Query to retrieve records from our database. A record is just a set of data about a unique record. If I want to see all of the books I own, I would execute the following query:

mysql> SELECT * FROM Books;

We start with “SELECT”, which just tells SQL that we will be returning records. Later we’ll look at other words that start SQL statement like DELETE, UPDATE, and INSERT. The “*” is a wildcard character. In this case it means “return all data about this record” or “return all columns of data for this record”. In place of the star we could list a specific subset of the columns or just specify our own order such as (Title, Author Last, Genre) to only return three columns of data. “FROM Books” just tells the database engine that we are trying to get data out of the Table named “Books.” This could have just has easily been Magazine, Movie, or Music, as long as the columns listed in the statement appear in that table. For example, we couldn’t perform a search for a column named “Call Letters” on a Music table if that table didn’t have its own column named “Call Letters”. The semicolon “;” is just a terminating character that tells MySQL to execute the preceding statement.

Now say we want to get a list of books by a specific author. This is where databases start to get really cool – they’re great at sorting your data very quickly. If we want to look up books by Joe Brown, we would construct a query like

mysql> SELECT * FROM Books WHERE AuthorLast = ‘Brown’;

This looks pretty much like our last query, but we’ve added a WHERE clause. The WHERE clause allows us to filter our data so we only retrieve those records we are interested in. You can construct advanced WHERE clauses, such as filtering only books by Joe Brown in the Romance genre published after December 21st, 1995. That WHERE clause would use “AND” between each statement, such as

… WHERE AuthorLast =’Brown’ AND Genre=’Romance’ AND PublishDate > ‘1995-21-12’;

Another useful filtering uses “OR” between statements. We can use OR to select books by multiple authors or genres, for example. A sample query for using WHERE and OR might look like

… WHERE AuthorLast =’Brown’ OR AuthorLast=’Martin’ OR AuthorLast=’Samson’;

Now you have learned what a database is, how to create a table, store some data, and pull it out with intelligent queries. Next time we’ll talk about what it means to have a so-called “relational” database and how to exploit a fuller feature set of the MySQL database engine.

Labels: , , , ,


Tuesday, November 25, 2008

Flutophone 2008: Incremental Update

The flutophone project has been around since the beginning of RobOrchestra, though not in its current form or even with its current name. Started as the "penny-whistle", the project was cobbled together with an old tin whistle, a few solenoids, some plastic fingers, and a little bit of engineering. Penny whistles are basically a long metal tube with holes along the length. Once the instrument was mounted on a base, plastic fingers were built around it that used the "on" or activated setting of the servo to close off an individual hole with a foam ear plug. There were 7 solenoid/arm pairs, one for each hole.

In 2006, a fresh team of undergraduates joined the team, ready to begin and tackle any challege. There were a few problems with this design that the team set out to fix. First, the holes weren't being sealed adequately by the ear plug design. There was some confusion as to whether the soldenoid driven arm didn't have enough force, or if the foam was simply too stiff to conform to the hole and create a good seal. We decided to address both concerns. In order to create a better seal we decided to use some light rubber discs, the kind that you buy to place under objects to prevent a surface from marring. The other aspect of the better seal was switching to a more geometrically desireable instrument, the flutophone. Flutophones have flat surfaces above each hole versus the highly curved surface the penny whistle provided. These changes helped alleviate the biggest challenge - making sure we could produce sound.

The second issue is that the solenoids clacked so loudly, even if the penny whistle/flutophone could get a few notes coaxed out, they would be drowned by metal clanging. We decided to build an enclosure around the solenoids and allow the acutators to pass through a "lid" to the fingers.


The "suspension bridge" design (cutaway view) modeled in SolidWorks

This is the design that we arrived at. We called it the "suspension bridge" approach since we had lots of cables running down sort of like a bridge. This design utilized a main "vertical" shaft that supported the flutophone, finger assembly, and the air tubing. The fingers were mounted to the shaft on dual axles that incorporated spring returns for hole closure. Cables attached to the fingers ran across a pivot point and down into the enclosure such that activating a solenoid would lift the corresponding finger, breaking the seal.

We designed the angles of the instrument such that the cables ran orthogonal (90deg) from the shaft, thus directing all of our force from each solenoid along the action of the finger. This stretched the base to around 18". I made the base out of fiberglass and fiberboard for the strength and light weight characteristics. We determined that the height of the enclosure should be ~3inches to allow clearance for the solenoid plungers. 

Much to our delight, door stops are exactly 3inches long, which provided both the clearance we wanted and had a nice side effect. Since the end of the doorstop is rubber, it provided some shock absorber or damping charactersitics between the "lid" and the enclosure. We also placed felt discs underneath the base to damp the vibrations between the enclosure and the surface it was sitting on. Most of these changes were made to reduce the obnoxious noise the solenoids made.


Plastic composite fingers were strong and stylish

The fingers were a lot of fun to design and construct. I used SolidWorks to model the entire assembly, and created the fingers in this context. I tried to mimic a humanoid shape so that they looked appealing (staying away from the uncanny valley though) and natural. The pivot point of the fingers was designed so that rotating it from its resting position would result in "perfectly" vertical motion (at the first instant). Due to the sine effect there would be little translation of the fingertip side to side, thus most of the displacement would be above the hole surface. If it had been designed differntly, the finger pad would need to rotate across the surface of the flutophone hole, shearing the pad and possibly breaking it off the fingertip.

The fingers were constructed by a three layer laminate. I used some 1/8" red plastic and some thinner white plastic, gluing them together and letting them dry overnight. Then I printed out my design from SolidWorks onto Avery address labels (full adhesive) so that I could simply trace my design while I was cutting each piece out. This was quite the tedious process since each finger was less than 3" long.

2006's design was "pretty" but not functional. We had designed with the best intentions but forgot that oh so helpful acroynm, KISS (Keep It Simple Stupid). You'll probably see me refer to that a lot because so often, the simplest and most elegant solution is the best in terms of cost, manpower, and resources. Plus, a simple solution is easier to change later down the road (in general).


The final design (prototyping material)

Thus, in 2007 I came back with new fervor. I was the last of the original flutophone design group (other members of RobOrchestra were still around), so it became my "pet" project. The design I came up with above is very compact and uses servos for acutation in both directions (open and closed). This was very important since we had tried both actuation==open and acutation==closed with marginal success. The main body bracket that housed the servos contained the entire structure of the new 'bot. We used HS-422 servos (72oz-in torque) which were more than we needed, but I got a good deal on them and we can always reuse them in the future.

The design uses 7 servos, one for each hole. The finger design is similar to that used in the past, just updated for the geometry of the new design. Each servo is connected a finger by a chain and sprocket (1:1) mechanism. For the most part this functions very well, but I had a few issues with keeping tension on the fingers. It was difficult to maintain a calibration on the position relative to the flutophone since there was so much backlash in the system. That part of the design is being updated to fix the backlash issues.

You can see a video demonstration of flutophone on Youtube. In the video, I walk you through the features of the robot and how everything is intended to work. On another video I may upload later, it is actually playing Mary Had a Little Lamb. The great thing about that video is that I was simultaneously the provider of air, program controller, and photographer. Yikes!

The current design is being finalized this year-the main thing that it needed was a few idler pulleys to maintain tension on the chains. Once that is complete she'll be as good as new and ready to play. I'm hoping that we can get the whole thing machined out of plastic so that it is more durable and more precise. We are also working on loading servo controller code onto the RobOrchestra boards, so it can play with the rest of the group. If you want to see more about flutophone, just leave a note in the comments!

Labels: , , , ,


Monday, November 24, 2008

Snarebot 2008: The Little Drummer "Boy"

The RobOrchestra Snarebot is finding its legs..err arms this year. The project is a few years old and has experienced incremental improvements over its lifetime. This time around we are looking to make a dramatic improvement based on the existing design and input from drumming consultants. We want to make it as realistic at drumming as possible with good dynamics and a pleasing sound.


The old design used two large solenoids pulling on cables to actuate the drum sticks. The wires were connected to specialized rubber holders that had built in compliance to allow the sticks to rebound quickly off the drum surface. These work really well and were one of the biggest components in the success of snarebot 1. What the 'bot lacked was good control over speed and dynamics - since solenoids are either "on" or "off", that's all you could coax out of it. Since there was a single pivot point, it was also impossible to induce different velocities out of the drum strike.


This is the design I envisioned last year - a small, portable device that could fit on any standard size drum. It was actually really neat, and I built a small prototype for the shell and legs. When you rotated the center handle the legs would extend or contract depending on the direction you turned. Since there wouldn't be much force opposing the legs (all downward) they would remain extended and the 'bot would perch happily on the edge of the drum.

This worked pretty well, but only left about an 8 diameter area in which to fit the drum stick mechanism. We found out that short sticks sound really flat since you couldn't get the pleasing resonance you normally hear from a snare drum. The device made had about 4" arm and could hit every 25ms, so speed wasn't an issue.


My sketch for this years' redesign is above. Its larger offset design allows for greater movement and the use of standard drum sticks, so we avoid the resonance issues of the past design. It will incorporate cable drives, solenoids, and servo motors to provide a wide range of speed and dynamics control lacking in Snarebot 1. The drawing isn't exactly to scale as the drum sticks actually stretch across the diameter of the drum, but after taking some measurements I verified the design is doable. Now it's just a matter of finding time to sit down and CAD model it in SolidWorks.

Some people have expressed concerns about latching onto the tuning bolts, but others say we should be fine. I've designed the 'bot this way so that we can eliminate the large clunky stand. It worked out pretty well for Snarebot 1, since you could easily reposition it, but we have something up our sleeves for this design that can accomplish the same thing.

You can't see it from this drawing, but the base will incorporate motorized translation and rotation so the snarebot can target different areas of the drum. Now, we're starting to talk about a lot of motors here, but each RobOrchestra controller board has ~16 outputs, so we should be fine. Hmmm....how about some neon underlighting?

Labels: , , , , , , , ,


Solidworks Lesson 1.3: Yo Yo

You'll notice in these lessons that I'm using SW 2008. These lessons should be valid for any version 2005+.

In this lesson I'll introduce two new features -- rotational extrusions and mirrored sketches.


Both of these tools are very useful for relating symmetrical geometry about an axis, whether 2D or 3D. If you get any errors during the lesson (highlighted lines and SW will tell you somethings wrong) try deleting some sketch relations. You can tweak the model after we're finished, but make sure you save it since we'll be working with it again later!

1. Open a new part in SolidWorks
2. Click the ‘Edit Sketch’ button (alternative way to start a sketch), and select the front plane.
3. Draw ½ of the top of a yo-yo (1/4 of a yo-yo) shape using lines and a sketch-fillet
a. Sketch fillets work the same way as feature fillets, but are faster to calculate
b. They can make geometry changes later on more difficult, so use them wisely


4. Add a centerline and mirror the top half of the yo-yo by selecting the entire sketch (left click and drag) and clicking the axis we want to mirror across. In this case we want to use the vertical centerline that starts at the origin (short line). This will simply reflect all of the lines we selected across that axis. You can dynamically change either side and the other side updates in real time to show the modifications. Pretty sweet!


5. Click the ‘exit sketch’ button once your sketch is fully defined
6. Click the ‘rotational extrude’ button and select the bottom line through the origin as our central axis. This is really similar to the mirror, except we are rotating a 2D sketch through space to create a 3D volume. You can do some pretty cool stuff with this tool (try making chess pieces!) so learn how to use it!.


7. Click the green check mark to create the 3d model
8. Play with your virtual yo-yo!


9. We can go back into our feature by right clicking on that feature in the Property Manager and selecting Edit Feature or Edit Sketch, depending on what we want to do.
10. Let’s select Edit Feature, and change the angle from 360 to 180 or 123 or 25.
11. Change your model back to 360, and click okay, or just click the red X.
12. Now let’s try Edit Sketch. This will allow us to go back and change our geometry.
a. Since we used a mirror, we only have to update one quarter of the geometry for everything to work. What a time saver!
b. You can drag the geometry around a little, or enter new dimensions.
c. Once you are satisfied with the changes, click the green check mark.

Labels: , , , ,


Sunday, November 23, 2008

What's in a Content Mangement System?

I've been losely referring to content management systems (CMS) and how amazing and magical they are. But what IS a CMS and what's involved with using one? Wikipedia gives a great definition:

A content management system (CMS) is a computer application used to create, edit, manage, and publish content in a consistently organized fashion. CMSs are frequently used for storing, controlling, versioning, and publishing industry-specific documentation such as news articles, operators' manuals, technical manuals, sales guides, and marketing brochures. The content managed may include computer files, image media, audio files, video files, electronic documents, and Web content.


What is in a CMS?
Your basic run of the mill content management system will have feature such as page addition, modification, deletion, access control (priviliges), the ability to restructure your site on the fly, and a file managment utility. The major CMSs have lots of functionality that you can expose with third party or open source plugins. If a CMS is making you do more work than using notepad and an FTP client, something is wrong. In fact, the whole point of a CMS is to make maintaining your site as pain free as possible. That's why so much of the work has been done for you. Those third party plugins can save you a lot of time and give your site functionalities that you wouldn't have ever thought of by yourself.

KISS
I'll admit, at first blush I thought a CMS was totally cheating. It's funny that I can be so young and yet an "old-school" web developer. After trying to manage my ever-expanding site a few years back, and barely coming up for air, I've seen the light. Some of you may be familar with the acronym KISS (Keep It Simple, Stupid). It's a helpful thing to keep in your backpocket no matter what type of project you find yourself involved with. A CMS is a beautfiul example of KISS in action.

Properly implemented, I should be able to log in to my site, and in just a few clicks be ready to publish a new article, open a forum, or revamp my home page. That's the goal of the custom CMS used at DanShope.com, and for the most part it works pretty well. The great thing about writing it myself is that I know how everything works and when I learn a new trick, I can apply it to my site.

That being said, open source solutions such as Drupal, Joomla, and OpenCMS also expose the code to you. If you're interested you can learn how these powerful suites work, and even become a contributor to the next release. Just be sure that you don't get so wrapped up in it you neglect your own site!

Why make a custom solution?
Well, seperate from the reason given above, I really like to control my content from the ground up. It's partly a matter of trust and partly OCD. Okay, so maybe not too extreme, but I do like to know what's going on. The CMSs listed above are very stable projects and you shouldn't have any fears of implementing them on your site.

That being said, for DanShope.com I wanted both the experience of writing my own CMS and the safety of owning my code and not being tied to anyone else's development. Since I wrote the scripts behind this site, I don't have to wade through pages of someone else's source code to try to add a new feature if community development stops.

Lets talk graphics
The other major facet of a custom CMS is related to graphics and site presententation. I'm not really talking about the ability to customize your site instead of blindly applying templates, but speaking more to the styling of the CMS itself.

As the graphics designer of DanShope.com I am obviously happy with my work (or else it would get changed). Since I am going to be using the CMS just as often as regular site interaction, I want to get to use the pretty interface as well. Thus, with my own solution I can control the CMS layout, down to the pixel. Thus, I get a consistent view whether I'm showing someone an article on the site or adding the next news post. That consistency also comes across as very professional. Part of good website design is re-using thematic elements as often as possible. Now, you don't want a boring layout that seems repetitive, but it should feel unified.

This can be difficult on large corporate sites that have multiple departments publishing content with different perspectives on good site layout. A CMS helps relieve that stress by forcing content into a particular mold, but a mold that you control. If sometime down the road you want to change site layout, you can propagate that change through all of your pages without blinking. Compare that to manually retrieving the source of each and every page and updating it to reflect the new changes. Believe me, I've done it and gone through a lot of ibuprofen in the process.

Third party CMS solutions can be really clunky since they need to be general purpose and work for a wide variety of sites. Truth be told, I'm not sure of a good way to implement a generic CMS that can look nice without sacrificing functionality. Since I know the type of content on DanShope.com I can intelligently structure the CMS so I can do what I need to while using a graphically consistent interface that feels intuitive to use.

How does it work?
The CMS solution on this site works as follows. I log in to a control panel, and select the type of managment I want to do (post to the blog, add a news article, welcome a new member, etc.). Once I select my action, I'm brought up to a page that let's me accomplish my goal. For a news site, this is a bunch of well placed text boxes that let me construct the article title, author, any references, and the article itself. I also have scripts to let me insert pictures into an article and create novel layouts at my whim.

When I'm done inserting content, I simply press "publish" and my page is inserted into the database, and a link is added to the news index. The news home and archive cached pages are both deleted so that they reflect the newly added content. None of the other articles need to be touched, unless I want to update the article relationships (related article suggestions).


The interface used to manage all news articles. It uses the same fonts, colors, and layout as the rest of the site so it feels very fluid and unified.

Later on, if I want to edit an existing article I simply click an edit button on the article page and am taken to another interface that mirrors the article creation page. The only difference here is that my content is preloaded and when I hit "publish" this time it will update the existing record instead of creating a whole new page. The cached pages get deleted again to reflect the updated record.

Conclusion
I hope that you now have a little better understanding of a general CMS and how the DanShope.com management system came to be. If you're looking for a free and easy to use CMS that includes hosting, why not start a blog? It's simple, and you get to join an ever growing community of bloggers (who are really cool, by the way). If you have your own domain, check out Joomla or Drupal. Both of these solutions are well-formed and have active development. I also recommend you do some reading. There's a lot that can be discussed about CMSs, too much to cover here, so if you want to learn something specific just ask in the comments!

Labels: , ,


Creation of a robotic arm


This is the robotic arm I built to demonstrate at the Cub Scout meeting a few days ago. It's main construction material is hardboard -- sort of like clipboard material but a little bit more flexible. Ideally it would be built out of aluminum, but hardboard is very fast to shape and drill through, so in the interest of time it was chosen. The total project time was under 48 hours from start to finish, which also included sleeping, eating, and classes in the middle.


The main shoulder joint is driven by a Hitec HS-805BB servo, a real monster. I like this servo a lot because it can pretty much give whatever you ask from it. Stall torque is rated at 343oz-in and I also had a gear reduction on the shoulder joint that increased the torque by about 1.75x.


The elbow joint was a lot of fun because I chose to use two HS-311 servos in conjunction. This configuration provides stability for both sides of the joint and bumps up the maximum torque. Since I still had a lot of mass to control outset from the elbow the extra capacity was necessary. These servos produce around 42oz-in of stall torque, which was sufficient for this design. In the actual controller code the servos rotate in opposite directions, so I had to be concious of them trying to fight each other. Overall this joint performed the best and was super fast!


Here's a side view of the whole 'bot. The gripper mechanism is pretty neat but not functional. You can sort of deduce this from the one piece of aluminum sheet metal holding it on. I ran out of time to make it work well, but decided to attach it for asthetic purposes. The basic mechanism has a rotating cam that spreads the two fingers. The grip is supplied by spring returns on each finger. It also features a passive locking system on the cam when the fingers are completely closed.

The large gear on the shoulder joint gave me a lot of problems since it wasn't a very high quality part. The interface between the HS-805BB servo and the shoulder gear was difficult to maintain and the joint frequently slipped when it was moved too fast. In an attempt to maintain that joint better I added the large aluminum brackets you see here. They did help a lot, but still couldn't maintain the level of consistency I wanted from the arm. I plan on re-machining everything from aluminum when I build the snare-bot arm (similar design) for strength and precision.


You can see the press-fit bearings used at the shoulder joint. It was pretty epic putting precision bearings into fibrous hardboard material. They fit quite snug, looked pretty, but were totally over-engineered for this choice of construction material. You can also see the controller board here -- a Lynxmotion SSC32. This board is my favorite serial servo controller I've used so far with 32 outputs, daisy chaining capabilities, a wide range of baud rates, and a relatively compact footprint.

The controller board was connected by serial cable to a laptop running Windows and a serial servo controller program I wrote. This is the "kid" version of the software which has pre-scripted macros for cool demonstrations. I typically use a stripped down version of this program to run all of my 'bots that use the SSC-32. If you are interested in the board go to Lynxmotion and check it out. If you get or have the board and want the basic software (8 channel control and terminal window) send me an email!


Labels: , , ,


Saturday, November 22, 2008

Page Caching with MySQL and PHP

I briefly mentioned about the server "caching" pages between MySQL and PHP via the CMS I employ. So what is this caching thing? Well, it's actually a pretty cool and really smart way of handling data. In the old days, when most pages were static and coded by hand, a user would visit a website, their browser would request the page from the server, the server would return the page, it would get downloaded, and the browser would display it to the user.


This worked well for a long time as few sites had frequently changing content and almost all pages were static. Once the web got more advanced and more news sites and other "dynamic" content started popping up, it became apparent that the old management schemes wouldn't be sufficient. Maintaining a site with any reasonable number of pages gets very difficult, especially as you add more and more content. Take for example a news site that includes a link to a monthly archive on each page. For the first few months, everything is pretty simple, but even four or five months in, you might be editing upwards of 150 pages with each coming month! That's absolute craziness and a waste of your time.

The solution? Keep your website under five pages. Just kidding. So how do you support dynamic content without the personal overhead? First, let's define "dynamic" content. Dynamic pages are those created on the fly by virtue of a content management system. CMSs are great because they allow the rapid addition, modification, and deletion of content from a website with only a few clicks. No more opening the HTML code and tediously copying tables and pasting the new data in place. There are commercial CMS packages that you can purchase, but I recommend one of the free open source solutions. Or, you could be really cool and roll your own!

To get back on topic, that sounds cool, but what does that have to do with caching? Old sites basically had the cache thing down pat. Their pages were static and required very little computation overhead from the server. All it had to do was say "Here! Found it!" and return the page. By contrast, SQL and PHP based systems have to pull the information from the database and generate the markup code EVERY time someone asks for it. That's like writing the same report over and over again: from scratch.

Caching is Your Friend
At the heart of caching is an inherent laziness. I like to call it working smart. Caching a page just means that the first time someone asks for the page, I create it, then store that pre-processed version. When the next person comes along, I just pull that pre-processed page off of my desk and hand it off, a nice throw back to the good ole' days of static web pages and animated gifs. This caching reduces the computational overhead (over time) since we can rely on work we did in the past. The only catch is that we have to be concious of deleting the cached pages every time a change is made.


So our flow looks more like that above. User requests a page, PHP scripts say "Hey! Do you have a cached version?" If not, the SQL database is polled to compile the page, and it's then stored on the server as a cached file. Once the next user comes along, the PHP script can pull the pre-processed page off the server and quickly display it to the user.

Show me the code!
This is the basic format of the page caching utility used by the news section at DanShope.com. Since there is one script that is accessed to display every single news article we must have some way of indentifying which page to render, which we pass as "id". The page first looks to see if a cached version of itself exists. If a file does exist, then it reads in the cached page and displays it, then exits. No more work needs to be done by the script, since we are relying on previously compiled markup.

If the cached file doesn't exist, we must create it. This is where the ob_start() function call comes in. It's simply a PHP function that freezes all data we write out into a buffer so that we can access it later. After the page is displayed the PHP script at the bottom simply gets all of the information out of the buffer and writes it to disk. Voila, you have a cached page.


<?php
....
$cacheFile=$_SERVER['DOCUMENT_ROOT']."/cache/id".$_GET["id"].".html";

if (file_exists($cacheFile)) //we can read this cache file back reduce database load
{
header("Content-Type: text/html");
readfile($cacheFile);
exit;
} else {
ob_start(); //start buffering so we can cache for future accesses
}
...
?>

<html><body>
DO THE HTML RENDERING HERE
</body></html>

<?php

// get the buffer
$buffer = ob_get_contents();

// end output buffering, the buffer content
// is sent to the client
ob_end_flush();

// now we create the cache file
$fp = fopen($cacheFile, "w");
fwrite($fp, $buffer);
fclose($fp);
?>
There are some other function calls going on here to handle the file creation and reading, but you can copy and paste this code without worrying about how they work. The code is fairly robust and I haven't had any problems with it so far. One thing I did add is a clause that allows me to delete the cached file if the page has changed.

Let's dig a little deeper...
Speed is one constraint here, but mostly we are concerned with sparing precious resources. There's a cost associated with maintaining a server and supplying content to users, and we want to minimize that cost as much as possible. There are other methods of caching around - your computer stores things in RAM (dynamic memory) that you access frequently so it can speed up retrieval processes. Your browser can cache content you access often so that it can show it to you sooner without fetching it repeatedly. This is called client-side caching, because you, the client, are storing the data. When the website you are accessing stores the content, it is called server-side caching.

Another important aspect of most caching strategies is the concept of "fresh" data. Caching is all well and good, but if you are caching (on the client side) a page that might change in the future, you probably want to update it at some point. Therefore, cached content can have an expiration date, much like that gallon of milk in your refrigerator. If it's been a long time since a page has been fetched, it might be a good idea to revisit the page and see if anything is new. Some more intelligent schemes can check if the page has changed without downloading the whole thing. All of these management strategies are designed to give users a quick and fluid experience while keeping server operation costs down. Everyone's a winner!

Labels: , , , ,


PHP and MySQL Content Management System

The backend for DanShope.com is a custom grown content management system (CMS) I wrote in PHP and SQL. A CMS is designed to allow simple yet powerful management of content across a site - blogging software is a common CMS a lot of people are familar with. A good CMS will abstract the physical content or meat of a page away from the HTML source code, so you can use a WYSIWYG editor or just a plain ole text box for input. The CMS then styles and produces your formatted page when someone wants to look at it.

MySQL and PHP are best friends and work really well together. MySQL is very fast and stable and allows for quick data manipulation across large datasets. A database is basically like a large spreadsheet that you can search, but it has some reallly neat features that make it irreplaceable. The power of SQL (structured query language) comes out in a well structured relational database.

A good database will be normalized, or reduce the amount of repeated data. For example, on DanShope.com the database is used to store a member id for each registered user. Each user can have multiple projects, each of which can have multiple pages. Thus we have a database table USERS and some tables PROJECTS and PAGES. When I look at any given page, I want to be able to tell what project it belongs to, and who that project belongs to. Through the magic of SQL I can construct my database such that this data doesn't need to be repeated in each page. Instead of PAGES having columns like (Page title, Author Name, Author ID, Email Address, Location, Website, Member Login, Page Content, Page Number, Project Title, Project Start Date, Project Category) I can just have the data unique to that page.

We get something that looks more like (Page ID, Page Title, Page Content, Project ID) and everything else is inferred by the relationship through project ID. Note that we don't even store the member information at all, since it can be found through the PROJECTS table (Project ID, Title, Start Date, Category, Member ID). This type of relationship really is magical because it allows intelligent and accessible data in a very compact form.

So, once we have a database, how do we get content in and out of it? That's where PHP comes in handy. PHP is great for online content creation because it interfaces so beautifully with HTML and other web based technologies. You can use a lot of languages with a SQL database, but for online communication PHP is the de-facto standard. There are PHP scripts running in the background that call up and create a page whenever you click on a link, and insert data when I use the adminstrative pages. There's some neat stuff like page caching and tagging behind the scenes that took a while to implement but were totally worthwhile.

I'll talk in a later post in more detail about how all of this works and where to find good resources online to roll your own CMS! If you've ever tried to manage a site without one it's really quite exciting and a big relief to let the computer do the heavy lifting. Never again will I try to manage a 100+ page website completely by hand!

Labels: , , ,


To OpenID or not to OpenID?

Today I looked at becoming an OpenID provider. For those of you not familiar with the technology, it's a decentralized standard for digital identities. What that boils down to is the ability for you to create a login at one place and use it across many web spaces. This is a great thing because you don't need to remember a bunch of different logins, and you don't have to manage them either!

OpenID was created by Brad Fitpatrick, LiveJournal creator and Six Apart contributor. The standard is backed by some of the biggest names in computing -- Google, Yahoo, Microsoft, VeriSign, and MySpace, to name a few. In addition it is supported by thousands of other sites who appreciate both the simplicity of control it brings and the additional members.

To sign up for your OpenID, you choose an Identity provider or OpenID Provider. If something happens to this guy, you can always change it later, but this entity is who will validate your login. Your OpenID is a URL: it could be your own website, or a URL tied to your identity provider. Logging in with an OpenID validates against your chosen provider for every site that supports OpenID you attempt to access. Since it's a community driven, free, open source, decentralized standard, any site can use OpenID for free!

The licensing currently states that "Nobody should own this. Nobody's planning on making any money from this. The goal is to release every part of this under the most liberal licenses possible, so there's no money or licensing or registering required to play. It benefits the community as a whole if something like this exists, and we're all a part of the community."

Why all the fuss? By now you should see a lot of the benefits of using an OpenID validation scheme, both for the users and the site owners (access to more people). No matter what I plan on implementing both a proprietary (DanShope.com only) login as well as an OpenID solution. There's more overhead involved with being an identity provider, and that's where the decision has yet to be made. Since there are so many other organizations providing OpenID registration, I'm not sure what better experience DanShope.com could give users.

For now, it's a tabled issue, but let me know your thoughts in the comments!

Labels: , , ,


Friday, November 21, 2008

Ongoing Projects

Once the Robotics Playground goes live, I'll have dedicated areas for the projects I'm involved in -- until then, I'll post some updates here!

The RobOrchestra team designs and builds musical robots. These might be a novel invention or replicate an existing instrument. Music is generated for each robot in real time, based on a chord progression algorithm using Markov graphs.

My work in the past has been on the flutophone, which started as a simple penny whistle. I've passed the project on to a younger generation, but my design will remain intact. You can see a video demonstration of the robotic flutophone here.

This year I am working on re-vamping the snare drumming robot, or SnareBot. The goal is to build a small portable drumming robot capable of accomplishing most rudimentary skills. The partner to this 'bot is the bass drum robot.

SIGMO is an ongoing project since 2005 -- to create an efficient humanoid robot. I've redefined the project goals over time, but basically I want something that can walk and talk like a person. I've done a lot of the work on talking and communicating with some success, and am in a redesign phase of the entire locomotion system.

I used to run www.sigmorobot.com, but let the domain run out a while back so I could focus on starting DanShope.com. The content that was on the old domain will be transferred to a holy place at my new site.

Mechanical Arm
This project was really fun -- designed and constructed in under 2 days for a robotics demonstration at a Cub Scout meeting. The kids (1st to 5th) graders really enjoyed playing with the arm and seemed to grasp the control interface pretty quickly. It's your basic robot arm -- round base (doesn't spin yet) with a large "shoulder" joint, elbow, and wrist flexion and rotation. The robotic gripper mechanism needs redesigned as the actuator cam jams in between the fingers.

I had to disassemble and reassemble parts of the robot while I was showing it to the kids, which sounds bad -- but by the end several were helping me put things back together! This was a realistic example of engineering -- things DO break, and you need to expect it and know how to fix or (or know how to get someone else to fix it).

ASME Mars Rover
I can't tell you too much about this one since it's for an engineering competition, but I am working with a great team of students from Carnegie Mellon to construct a small but capable "Mars Rover" for the 2009 American Society of Mechanical Engineers Student Professional Development Conference coming up this spring. The competiton is an annual affair but the design challenge changes each year. You can find out more information at www.asme.org. We'll be competing in Dayton, OH sometime in late April.


SolidWorks Lesson 1.2: Your First Part (Donut)

For your first lesson we'll start off with the basics. After this lesson you should know some basic techniques of CAD modeling and begin to understand the Solidworks interface. You might also be hungry, if we do a good job with our donut!

  1. Start with a new part (File, New, Ctrl+N)

  2. Click the ‘Extrude Boss/Base’ button

  3. Now we will need to select a plane – TOP
    1. If you hover over a plane, it will be outlined in red
    2. Clicking on this plane will select it – if you make a mistake, we can exit the sketch and start over

  4. The window will rotate to the top view, centered on the origin

  5. Click on the ‘circle’ tool on the sketch toolbar

  6. Click on the origin, then click again outside of the origin
    1. While you are moving the mouse, you will see the circle being created
    2. We will set the size later on

  7. Now make another larger circle using the same technique.

  8. Now our sketch is created, but we should put sizes on.
    1. Locate the ‘smart dimension’ button on the dimensions toolbar
    2. Click this, then click the inner circle
    3. Drag your mouse away to see the different dimensions (diameter)
    4. Click again to set the diameter
      i.      You can drag this dimension around at any point in time
  1. BEFORE you put a value in, let’s get a dimension between the two circles
    1. Find the “Smart Dimension” button on the toolbar and click on it.
    2. Select both circles, one after the other – order doesn’t matter here.
    3. Do this first so the inner dimension remains the inner circle.                                                              i.      Your initial drawing scale may be off enough that this matters.
    4. We could get have used the offset dimension
      i.      Useful for more complex geometries
  1. Set this to 1 inch.
    1. SW will automatically convert dimensions for you if you are using the suffix (mm, inches, etc.)
    2. You can change the mode (for this document) by going to tools (menu), options (menu), document properties (tab), then units (list), choose IPS
  2. Now double-click on the first dimension, and set it to 1.0 inches
  3. We will now click the “exit sketch” button to get the Extrusion options dialog
    1. Type 1” for the height of the extrusion – the direction doesn’t matter
    2. Click the Green Check (okay button)
  4. You should now have a washer shaped 3D object – you can zoom, rotate, and scale the viewport (dimensions are constrained)
  5. Let’s make a donut – click on the fillet button (rounded corner)
    a. Set the radius to 0.5” (1/2”); select both the top and bottom edge inside & outside edge of our model (4 selections).
    i. The inside and outside faces could also be selected (2 selections)
    b. Click the green check mark.
  1. Now we have a donut!
    1. You can set the color or texture
    2. We can take a bite out of it….but that’s another lesson!

We could have made this several different ways – you could have made a cylinder, and cut a hole in the middle, then filleted. You could have started with a square and rounded the corners, cut out a hole, and then filleted. In general, the more you do with a sketch, the more efficient your model is.

Labels: , , , ,


SolidWorks 101: Lesson 1

I'm starting a series of lessons on beginning CAD with SolidWorks, a great 3D package that I have grown to depend on and enjoy. SolidWorks has some great tutorials within the software you can use - I started writing these tutorials as part of  a one day course I taught for beginners. These are designed for use while using a copy of SolidWorks. So, without further ado, let your introduction to parametric modeling begin!

SolidWorks is a great tool, because you can sit down and learn how to do things yourself.  Some other modeling programs have such a complicated workflow that it is almost necessary to have either a teacher or manual.  SolidWorks is a powerful CAD package, but is presented in a format that is easy to process and understand. I encourage you to play around and learn your own workflow and explore features we may not cover here.

What to take away:
- A basic understanding of how 3D CAD works (terminology, etc) and how to leverage the tools provided to produce simple and functional models.
- “Best practices” or design methodologies to create models that are realistic in terms of constraints and manufacturing techniques
- Design intent – constraining your sketches & dimensions in ways that simplify future modification without losing the reasoning behind certain dimensions (1/2 of width d, etc)

Basic Features
Extrude Boss/Base
Extrude Cut
Sweeps
Rotational Solids
Rotational Cuts
Lofts
Sheet Metal
Fillets/Chamfers

How do we create parts? With sketches - using basic shapes – circles, rectangles, lines, curves – or complex geometry such as splines, repeating patterns, etc.

Solidworks allows rapid model creation by allowing the use of pre-existing geometry to constrain features & sketches.


Lesson 1.1: The Interface


The Solidworks interface is a large window where you create and modify your design, surrounded by toolbars that enhance your interaction with the 3d model.

When starting out, you can use large icons with text labels – as you get more advanced, you can turn the labels off, use small icons, even turn toolbars on and off.  When you feel really comfortable with the program, you can customize toolbars down to the order of icons and set the content for each toolbar.


Throughout the different versions of SolidWorks the icons for different operations have remained the same. The yellowish icons are for operations called "features" -- they modify or create 3D geometries. The blue icons are sketch related operations and create 2D layouts that are used to create 3D geometries through extrusions, cuts, and rotations. You can intuit this from the well-designed buttons that either show an enclosed volume or a line segment.


**Tools you will make use of** the zoom functions and standard views are your best friends! Learn to be comfortable with them, and understand the rotation of your models. I highly recommend that you add the standard views to your toolbar if they aren't already there. Just right click anywhere on the toolbar and select "Standard Views."

Labels: , , ,


Just for starters...

So, I've taken the plunge; I am going to become a blogger. One more voice in the interweb wind.

This is a sister area of DanShope.com my personal site and the home of the robotics community that I host. I'll be posting updates about the site and how the development is going, as well as some helpful guides for starting robotics, using CAD software, learning FEA, and being an effective web developer.

If you have any suggestions for articles/posts you'd like to see written, feel free to contact me. I love getting mail about the site and can generally respond pretty quickly. In the mean time, head on over and check us out!

We've got great news about upcoming robotic technologies and medical robotics as well as other interesting engineering topics. The robotics playground community hasn't gone live yet, but I'm hoping to push out of the development phase and get released by the end of the year.

I'll keep you posted!

Labels: , ,


Subscribe to RSS Feed
Subscribe to DanShope.com
Who writes This Stuff?
Daniel Shope is the site owner and moderator of DanShope.com, a portal dedicated to robotics and engineering. Dan is currently a student at Carnegie Mellon University and is pursuing dual degrees in Mechanical and Biomedical engineering.

View Daniel Shope's profile on LinkedIn
Advertisements