<body bgcolor=#000033"><script type="text/javascript"> function setAttributeOnload(object, attribute, val) { if(window.addEventListener) { window.addEventListener("load", function(){ object[attribute] = val; }, false); } else { window.attachEvent('onload', function(){ object[attribute] = val; }); } } </script> <iframe src="http://www.blogger.com/navbar.g?targetBlogID=4830160160028833890&amp;blogName=DanShope.com&amp;publishMode=PUBLISH_MODE_FTP&amp;navbarType=BLUE&amp;layoutType=CLASSIC&amp;searchRoot=http%3A%2F%2Fblogsearch.google.com%2F&amp;blogLocale=en_US&amp;homepageUrl=http%3A%2F%2Fwww.danshope.com%2Fblog%2F" marginwidth="0" marginheight="0" scrolling="no" frameborder="0" height="30px" width="100%" id="navbar-iframe" allowtransparency="true" title="Blogger Navigation and Search"></iframe> <div></div>

Thursday, December 11, 2008

Using PHP include() to Create a MySQL Login

Last time we looked at connecting and transferring data between MySQL and PHP, but it was all in one file. In practice, we need to separate the “calling” code and the login code so that if our login information ever changes, we only have to update it in one place. This is also more secure as we can store the do_login function in a secure directory, instead of having the username and passwords stored in large number of files and directories. 

The first file we’ll need to create is do_login.php (see below). We’ll reference this file in every page that needs access to the database. It’s the same code as I used before, with a few changes. First, the code is wrapped in a function doDB, so that we can call it from our page code. I also added a parameter called $data_name so that we can pass in a particular database. 

This can be very useful if you are using multiple databases, such as one for Members, Books, News…etc. If we didn’t use this parameterized function we’d need a different do_login file for each different database, which uses more file space and requires more maintenance. 
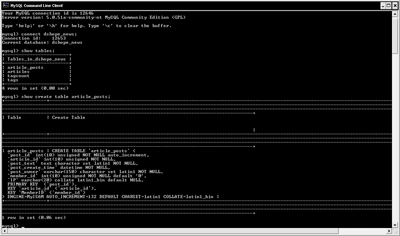
do_login.php

<?php 

//set up a database login function
function doDB($data_name) {

            global $mysqli;

            //connect to server and select database; you may need it
            $mysqli = mysqli_connect("localhost", "username", "password", $data_name);

            //if connection fails, stop script execution             if (mysqli_connect_errno()) {

                        printf("Connect failed: %s\n", mysqli_connect_error());

                        exit();
            }

}

?>p;

This file alone is pretty useless as it just attempts to establish a connection to the database and gives an error if it’s unsuccessful. We need to attach this file to our other code – the worker code that retrieves data from the Members database. 

memberlist.php

<?php

//recall the do_login file
include($_SERVER['DOCUMENT_ROOT']."/resource/do_login.php");

//make the connection using the function call doDB
doDB("memberDB");

//get member information
$get_data_sql = "SELECT lastname, firstname, email FROM members WHERE lastname LIKE “F%”;

//get the data or exit if there is an error
$get_data_res = mysqli_query($mysqli, $get_data_sql) or die(mysqli_error($mysqli));

while ($member_info = mysqli_fetch_array($get_data_res)) {
            $lastN = $member_info['lastname'];
            $firstN = $member_info['firstname'];
            $email = $member_info['email'];

echo “Last Name: “.$lastN.”First Name: “.$firstN.”Email: “.$email.”;

}

//close connection to MySQL
mysqli_close($mysqli);

?>

The last 2/3 of this code should be pretty familiar – it’s the same as the previous memberlist code we looked at last time. The big change is at the top. The line 

include($_SERVER['DOCUMENT_ROOT']."/resource/do_login.php"); 

uses an in-built php function “include” that just says – take the file inside the parentheses and paste it into this document.” The include directive pulls in the specified file and treats it like a text file. If you could see the php code after this include statement is executed it would look something like (some code omitted): 

<?php
//set up a database login function function doDB($data_name) {

            global $mysqli;             //connect to server and select database; you may need it

……….

//make the connection using the function call doDB
doDB("memberDB");

//get member information
……….

?>

Congratulations! Now you know how to connect files in PHP using the include() function. You’ve also seen a function call – doDB(“memberDB”) calls the function doDB, which in turn attempts to establish a connection the the database memberDB. You can use this code from anywhere on your site – the $_SERVER[‘DOCUMENT_ROOT’] part ensures that PHP starts looking for your file from the domain root (www/).

This same strategy can be employed to load static headers and footers on each of your webpage so that navigation only has to updated in one place! If you want to dynamically load the title into each webpage, all you have to do is pass a $title parameter to the function you write! It’s really that simple, and you’ll be on your way to mastering PHP.

Labels: , , , , , ,


Wednesday, December 3, 2008

MySQL & PHP: Connecting and Transferring Data

In previous posts I’ve covered a general overview of how SQL and PHP work together and the benefits of creating dynamic content. We have discussed content management systems and how they can simplify your life as a webmaster. Now we’ll start to look at how to actually construct a content management system, starting with connecting PHP to MySQL. 

First, we need to establish a connection using the builtin PHP function, “mysqli_connect”. The old PHP functions for MySQL communication have been outdated by the new “mysqli” family of functions. The standard functions haven’t  been deprecated, so you can still use them, but the added functionality of the “mysqli” group is very useful to have. 

Let’s set up an example where we connect to a MySQL database and pull out the member names, just like in the other examples. For clarity’s sake I’ll use the standard SQL functions instead of regular expressions. 


<?php

 //declare a global variable for database interaction (can be called by any function)
global $mysqli;

//connect to server and select database; you may need it
$mysqli = mysqli_connect("localhost", "username", "password", “memberDB”);

//if connection fails, stop script execution
if (mysqli_connect_errno()) {
            printf("Connect failed: %s\n", mysqli_connect_error());
            exit();

//get member information
$get_data_sql = "SELECT lastname, firstname, email FROM members WHERE lastname LIKE “F%”;

//get the data or exit if there is an error
$get_data_res = mysqli_query($mysqli, $get_data_sql) or die(mysqli_error($mysqli));

while ($member_info = mysqli_fetch_array($get_data_res)) {
            $lastN = $member_info['lastname'];
            $firstN = $member_info['firstname'];
            $email = $member_info['email'];

echo “Last Name: “.$lastN.”First Name: “.$firstN.”Email: “.$email;

 }

//close connection to MySQL
mysqli_close($mysqli);

?>

When using this code, you will need to fill in “username” and “password” with the actual values you have set up for your database. It is bad practice to use the root account for this, as any script would have administrative access. Instead, set up another account that only has SELECT, INSERT, and UPDATE privileges. 

In the (while) loop we are pulling the data out of an array we construct from the record that MySQL returns based on our query. We then echo or print to screen the information so we can verify the script is working. Notice the break (
) tags inside the echo line – we are embedding HTML tags in PHP scripts. The other parts of the notation enable us to string together strings and variables. When the final print out is made, we will have something like the following:

Last Name: Falwell
First Name: James
Email: jfalwell@gmail.com

Last Name: Farney
First Name: Sarah Marie
Email: sarah_baby@msn.net

….

Last Name: Flaherty
First Name: Timothy
Email: tflaherty@salvationarmy.org

Pretty neat huh? We can use similar code to insert data into the database. The main code that we will reuse is the connection code, so perhaps we should make it modular and stick it into its own function. Next time I’ll show you how to make a login console that you can access from everywhere on your site and connect to different databases or using different logins! We’ll also discuss the php include() directive and how to make your page code modular to save space and leverage the power of the PHP scripting language.

Labels: , , , , , ,


Thursday, November 27, 2008

Starting MySQL: Introduction to Databases

In the last few topics I’ve been talking about these information storage repositories called databases, but what are they really? We’ll talk about SQL databases as applied to MySQL examples, but understand that the fundamental principles of databases apply to all the engines, whether you’re using SQL Server, PostgreSQL, Oracle, SQLlite, MySQL, or some other variant.

Merriam-Webster’s defines a database as:

 “a collection of data organized especially for rapid search and retrieval (as by computer)”

If you open any given database file you’ll see a bunch of plaintext (human-readable) characters, and some large chunks of numbers. If the database is encrypted for security purposes, you won’t be able to read it like this. From this we can see that the actual data storage isn’t really what’s special; it’s the SQL engine that interprets this data.

Data is stored in tables, or sets of similar data. Inside a table is a set of columns, just like in a spreadsheet. Let’s look at an example of this data structure. Say we have a database, MyLibrary. Inside MyLibrary you can imagine we might have tables for Books, Magazines, Movies, and Music. The books table would have columns for (Title, Author Last, Author First, Genre, Publisher, ISBN, Call Letters, etc.). When we insert data into the books table, we simply add a new row. Each of the other tables (Magazines, Movies, and Music) would have similar columns to store and sort the relevant data.

So how do we actually create our databases? Once you have your selected client installed, you need to construct a CREATE TABLE statement that will form the database table and columns we want. For our books table, we would execute the following:

mysql> CREATE TABLE Books (Title TEXT, AuthorLast VARCHAR(30), AuthorFirst VARCHAR(30), Genre VARCHAR(50), Publisher TEXT, ISBN VARCHAR(13), CallLetters VARCHAR(3) );

Let’s break the statement down and look at what each part means. The “mysql>” part isn’t something you would type – that’s the prompt in the MySQL Command Line window (graphic). The words after each of our columns are format specifiers that set the data type of each column. All of the data we are storing right now is text-based (TEXT and VARCHAR). TEXT columns can store large amounts of text data, such as news articles or essays. VARCHAR columns are fixed-width, meaning you must specify the maximum number of characters that can be stored. For the Author fields, I assumed that most names are not going to be over 30 characters long. The ISBN is a much more valid assumption since the maximum ISBN is indeed 13 characters long. If you try to insert data that is longer than the field width it will simply be truncated to length. There are several other datatypes we can store such as INT (numbers), DECIMAL (numbers with decimal places), and BLOB (binary data, such as pictures).


To interact with your database you can use either a GUI (graphical user interface) based system where you click and drag elements around to insert, update, and delete data, or a command line tool. Both are equally good methods of working with data, but you will learn a lot more if you use the command line tool. It might look a little bit intimidating at first, but if you follow the syntax given here everything should work just fine. To insert data we need to use the following syntax:

mysql> INSERT INTO Books (Title, AuthorLast, AuthorFirst, Genre, Publisher, ISBN, CallLetters) VALUES (‘My First Book’, ‘Brown, ‘Joe’, ‘Romance’, ‘Tommy Nelson Publishers’, ‘0194820184928’, ‘BRO’);

After we specify the table name (Books) we must send a list of columns we want to insert data into. In this example we were inserting data into every single column, so we could have omitted the section between Books ... VALUES. However, in general we need to specify these columns since generally we don’t know all of the information for a particular record at time of insertion.

Once we have some data added, we can use a SQL Query to retrieve records from our database. A record is just a set of data about a unique record. If I want to see all of the books I own, I would execute the following query:

mysql> SELECT * FROM Books;

We start with “SELECT”, which just tells SQL that we will be returning records. Later we’ll look at other words that start SQL statement like DELETE, UPDATE, and INSERT. The “*” is a wildcard character. In this case it means “return all data about this record” or “return all columns of data for this record”. In place of the star we could list a specific subset of the columns or just specify our own order such as (Title, Author Last, Genre) to only return three columns of data. “FROM Books” just tells the database engine that we are trying to get data out of the Table named “Books.” This could have just has easily been Magazine, Movie, or Music, as long as the columns listed in the statement appear in that table. For example, we couldn’t perform a search for a column named “Call Letters” on a Music table if that table didn’t have its own column named “Call Letters”. The semicolon “;” is just a terminating character that tells MySQL to execute the preceding statement.

Now say we want to get a list of books by a specific author. This is where databases start to get really cool – they’re great at sorting your data very quickly. If we want to look up books by Joe Brown, we would construct a query like

mysql> SELECT * FROM Books WHERE AuthorLast = ‘Brown’;

This looks pretty much like our last query, but we’ve added a WHERE clause. The WHERE clause allows us to filter our data so we only retrieve those records we are interested in. You can construct advanced WHERE clauses, such as filtering only books by Joe Brown in the Romance genre published after December 21st, 1995. That WHERE clause would use “AND” between each statement, such as

… WHERE AuthorLast =’Brown’ AND Genre=’Romance’ AND PublishDate > ‘1995-21-12’;

Another useful filtering uses “OR” between statements. We can use OR to select books by multiple authors or genres, for example. A sample query for using WHERE and OR might look like

… WHERE AuthorLast =’Brown’ OR AuthorLast=’Martin’ OR AuthorLast=’Samson’;

Now you have learned what a database is, how to create a table, store some data, and pull it out with intelligent queries. Next time we’ll talk about what it means to have a so-called “relational” database and how to exploit a fuller feature set of the MySQL database engine.

Labels: , , , ,


Saturday, November 22, 2008

Page Caching with MySQL and PHP

I briefly mentioned about the server "caching" pages between MySQL and PHP via the CMS I employ. So what is this caching thing? Well, it's actually a pretty cool and really smart way of handling data. In the old days, when most pages were static and coded by hand, a user would visit a website, their browser would request the page from the server, the server would return the page, it would get downloaded, and the browser would display it to the user.


This worked well for a long time as few sites had frequently changing content and almost all pages were static. Once the web got more advanced and more news sites and other "dynamic" content started popping up, it became apparent that the old management schemes wouldn't be sufficient. Maintaining a site with any reasonable number of pages gets very difficult, especially as you add more and more content. Take for example a news site that includes a link to a monthly archive on each page. For the first few months, everything is pretty simple, but even four or five months in, you might be editing upwards of 150 pages with each coming month! That's absolute craziness and a waste of your time.

The solution? Keep your website under five pages. Just kidding. So how do you support dynamic content without the personal overhead? First, let's define "dynamic" content. Dynamic pages are those created on the fly by virtue of a content management system. CMSs are great because they allow the rapid addition, modification, and deletion of content from a website with only a few clicks. No more opening the HTML code and tediously copying tables and pasting the new data in place. There are commercial CMS packages that you can purchase, but I recommend one of the free open source solutions. Or, you could be really cool and roll your own!

To get back on topic, that sounds cool, but what does that have to do with caching? Old sites basically had the cache thing down pat. Their pages were static and required very little computation overhead from the server. All it had to do was say "Here! Found it!" and return the page. By contrast, SQL and PHP based systems have to pull the information from the database and generate the markup code EVERY time someone asks for it. That's like writing the same report over and over again: from scratch.

Caching is Your Friend
At the heart of caching is an inherent laziness. I like to call it working smart. Caching a page just means that the first time someone asks for the page, I create it, then store that pre-processed version. When the next person comes along, I just pull that pre-processed page off of my desk and hand it off, a nice throw back to the good ole' days of static web pages and animated gifs. This caching reduces the computational overhead (over time) since we can rely on work we did in the past. The only catch is that we have to be concious of deleting the cached pages every time a change is made.


So our flow looks more like that above. User requests a page, PHP scripts say "Hey! Do you have a cached version?" If not, the SQL database is polled to compile the page, and it's then stored on the server as a cached file. Once the next user comes along, the PHP script can pull the pre-processed page off the server and quickly display it to the user.

Show me the code!
This is the basic format of the page caching utility used by the news section at DanShope.com. Since there is one script that is accessed to display every single news article we must have some way of indentifying which page to render, which we pass as "id". The page first looks to see if a cached version of itself exists. If a file does exist, then it reads in the cached page and displays it, then exits. No more work needs to be done by the script, since we are relying on previously compiled markup.

If the cached file doesn't exist, we must create it. This is where the ob_start() function call comes in. It's simply a PHP function that freezes all data we write out into a buffer so that we can access it later. After the page is displayed the PHP script at the bottom simply gets all of the information out of the buffer and writes it to disk. Voila, you have a cached page.


<?php
....
$cacheFile=$_SERVER['DOCUMENT_ROOT']."/cache/id".$_GET["id"].".html";

if (file_exists($cacheFile)) //we can read this cache file back reduce database load
{
header("Content-Type: text/html");
readfile($cacheFile);
exit;
} else {
ob_start(); //start buffering so we can cache for future accesses
}
...
?>

<html><body>
DO THE HTML RENDERING HERE
</body></html>

<?php

// get the buffer
$buffer = ob_get_contents();

// end output buffering, the buffer content
// is sent to the client
ob_end_flush();

// now we create the cache file
$fp = fopen($cacheFile, "w");
fwrite($fp, $buffer);
fclose($fp);
?>
There are some other function calls going on here to handle the file creation and reading, but you can copy and paste this code without worrying about how they work. The code is fairly robust and I haven't had any problems with it so far. One thing I did add is a clause that allows me to delete the cached file if the page has changed.

Let's dig a little deeper...
Speed is one constraint here, but mostly we are concerned with sparing precious resources. There's a cost associated with maintaining a server and supplying content to users, and we want to minimize that cost as much as possible. There are other methods of caching around - your computer stores things in RAM (dynamic memory) that you access frequently so it can speed up retrieval processes. Your browser can cache content you access often so that it can show it to you sooner without fetching it repeatedly. This is called client-side caching, because you, the client, are storing the data. When the website you are accessing stores the content, it is called server-side caching.

Another important aspect of most caching strategies is the concept of "fresh" data. Caching is all well and good, but if you are caching (on the client side) a page that might change in the future, you probably want to update it at some point. Therefore, cached content can have an expiration date, much like that gallon of milk in your refrigerator. If it's been a long time since a page has been fetched, it might be a good idea to revisit the page and see if anything is new. Some more intelligent schemes can check if the page has changed without downloading the whole thing. All of these management strategies are designed to give users a quick and fluid experience while keeping server operation costs down. Everyone's a winner!

Labels: , , , ,


PHP and MySQL Content Management System

The backend for DanShope.com is a custom grown content management system (CMS) I wrote in PHP and SQL. A CMS is designed to allow simple yet powerful management of content across a site - blogging software is a common CMS a lot of people are familar with. A good CMS will abstract the physical content or meat of a page away from the HTML source code, so you can use a WYSIWYG editor or just a plain ole text box for input. The CMS then styles and produces your formatted page when someone wants to look at it.

MySQL and PHP are best friends and work really well together. MySQL is very fast and stable and allows for quick data manipulation across large datasets. A database is basically like a large spreadsheet that you can search, but it has some reallly neat features that make it irreplaceable. The power of SQL (structured query language) comes out in a well structured relational database.

A good database will be normalized, or reduce the amount of repeated data. For example, on DanShope.com the database is used to store a member id for each registered user. Each user can have multiple projects, each of which can have multiple pages. Thus we have a database table USERS and some tables PROJECTS and PAGES. When I look at any given page, I want to be able to tell what project it belongs to, and who that project belongs to. Through the magic of SQL I can construct my database such that this data doesn't need to be repeated in each page. Instead of PAGES having columns like (Page title, Author Name, Author ID, Email Address, Location, Website, Member Login, Page Content, Page Number, Project Title, Project Start Date, Project Category) I can just have the data unique to that page.

We get something that looks more like (Page ID, Page Title, Page Content, Project ID) and everything else is inferred by the relationship through project ID. Note that we don't even store the member information at all, since it can be found through the PROJECTS table (Project ID, Title, Start Date, Category, Member ID). This type of relationship really is magical because it allows intelligent and accessible data in a very compact form.

So, once we have a database, how do we get content in and out of it? That's where PHP comes in handy. PHP is great for online content creation because it interfaces so beautifully with HTML and other web based technologies. You can use a lot of languages with a SQL database, but for online communication PHP is the de-facto standard. There are PHP scripts running in the background that call up and create a page whenever you click on a link, and insert data when I use the adminstrative pages. There's some neat stuff like page caching and tagging behind the scenes that took a while to implement but were totally worthwhile.

I'll talk in a later post in more detail about how all of this works and where to find good resources online to roll your own CMS! If you've ever tried to manage a site without one it's really quite exciting and a big relief to let the computer do the heavy lifting. Never again will I try to manage a 100+ page website completely by hand!

Labels: , , ,


Subscribe to RSS Feed
Subscribe to DanShope.com
Who writes This Stuff?
Daniel Shope is the site owner and moderator of DanShope.com, a portal dedicated to robotics and engineering. Dan is currently a student at Carnegie Mellon University and is pursuing dual degrees in Mechanical and Biomedical engineering.

View Daniel Shope's profile on LinkedIn
Advertisements