Flutophone 2008: Incremental Update
The flutophone project has been around since the beginning of RobOrchestra, though not in its current form or even with its current name. Started as the "penny-whistle", the project was cobbled together with an old tin whistle, a few solenoids, some plastic fingers, and a little bit of engineering. Penny whistles are basically a long metal tube with holes along the length. Once the instrument was mounted on a base, plastic fingers were built around it that used the "on" or activated setting of the servo to close off an individual hole with a foam ear plug. There were 7 solenoid/arm pairs, one for each hole.


In 2006, a fresh team of undergraduates joined the team, ready to begin and tackle any challege. There were a few problems with this design that the team set out to fix. First, the holes weren't being sealed adequately by the ear plug design. There was some confusion as to whether the soldenoid driven arm didn't have enough force, or if the foam was simply too stiff to conform to the hole and create a good seal. We decided to address both concerns. In order to create a better seal we decided to use some light rubber discs, the kind that you buy to place under objects to prevent a surface from marring. The other aspect of the better seal was switching to a more geometrically desireable instrument, the flutophone. Flutophones have flat surfaces above each hole versus the highly curved surface the penny whistle provided. These changes helped alleviate the biggest challenge - making sure we could produce sound.
The second issue is that the solenoids clacked so loudly, even if the penny whistle/flutophone could get a few notes coaxed out, they would be drowned by metal clanging. We decided to build an enclosure around the solenoids and allow the acutators to pass through a "lid" to the fingers.

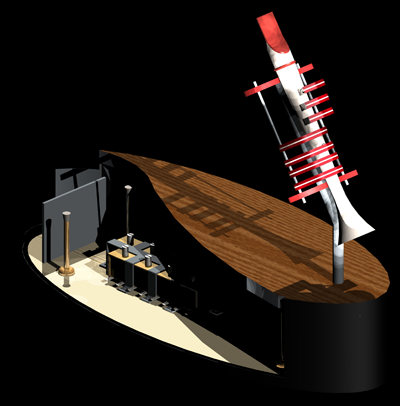
The "suspension bridge" design (cutaway view) modeled in SolidWorks
This is the design that we arrived at. We called it the "suspension bridge" approach since we had lots of cables running down sort of like a bridge. This design utilized a main "vertical" shaft that supported the flutophone, finger assembly, and the air tubing. The fingers were mounted to the shaft on dual axles that incorporated spring returns for hole closure. Cables attached to the fingers ran across a pivot point and down into the enclosure such that activating a solenoid would lift the corresponding finger, breaking the seal.
We designed the angles of the instrument such that the cables ran orthogonal (90deg) from the shaft, thus directing all of our force from each solenoid along the action of the finger. This stretched the base to around 18". I made the base out of fiberglass and fiberboard for the strength and light weight characteristics. We determined that the height of the enclosure should be ~3inches to allow clearance for the solenoid plungers.
Much to our delight, door stops are exactly 3inches long, which provided both the clearance we wanted and had a nice side effect. Since the end of the doorstop is rubber, it provided some shock absorber or damping charactersitics between the "lid" and the enclosure. We also placed felt discs underneath the base to damp the vibrations between the enclosure and the surface it was sitting on. Most of these changes were made to reduce the obnoxious noise the solenoids made.

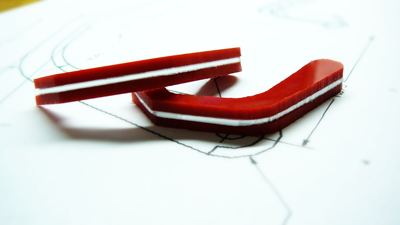
Plastic composite fingers were strong and stylish
The fingers were a lot of fun to design and construct. I used SolidWorks to model the entire assembly, and created the fingers in this context. I tried to mimic a humanoid shape so that they looked appealing (staying away from the uncanny valley though) and natural. The pivot point of the fingers was designed so that rotating it from its resting position would result in "perfectly" vertical motion (at the first instant). Due to the sine effect there would be little translation of the fingertip side to side, thus most of the displacement would be above the hole surface. If it had been designed differntly, the finger pad would need to rotate across the surface of the flutophone hole, shearing the pad and possibly breaking it off the fingertip.
The fingers were constructed by a three layer laminate. I used some 1/8" red plastic and some thinner white plastic, gluing them together and letting them dry overnight. Then I printed out my design from SolidWorks onto Avery address labels (full adhesive) so that I could simply trace my design while I was cutting each piece out. This was quite the tedious process since each finger was less than 3" long.
2006's design was "pretty" but not functional. We had designed with the best intentions but forgot that oh so helpful acroynm, KISS (Keep It Simple Stupid). You'll probably see me refer to that a lot because so often, the simplest and most elegant solution is the best in terms of cost, manpower, and resources. Plus, a simple solution is easier to change later down the road (in general).

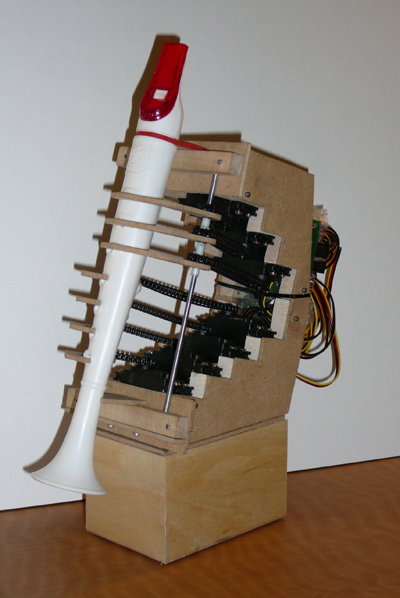
The final design (prototyping material)
Thus, in 2007 I came back with new fervor. I was the last of the original flutophone design group (other members of RobOrchestra were still around), so it became my "pet" project. The design I came up with above is very compact and uses servos for acutation in both directions (open and closed). This was very important since we had tried both actuation==open and acutation==closed with marginal success. The main body bracket that housed the servos contained the entire structure of the new 'bot. We used HS-422 servos (72oz-in torque) which were more than we needed, but I got a good deal on them and we can always reuse them in the future.
The design uses 7 servos, one for each hole. The finger design is similar to that used in the past, just updated for the geometry of the new design. Each servo is connected a finger by a chain and sprocket (1:1) mechanism. For the most part this functions very well, but I had a few issues with keeping tension on the fingers. It was difficult to maintain a calibration on the position relative to the flutophone since there was so much backlash in the system. That part of the design is being updated to fix the backlash issues.
You can see a video demonstration of flutophone on Youtube. In the video, I walk you through the features of the robot and how everything is intended to work. On another video I may upload later, it is actually playing Mary Had a Little Lamb. The great thing about that video is that I was simultaneously the provider of air, program controller, and photographer. Yikes!
The current design is being finalized this year-the main thing that it needed was a few idler pulleys to maintain tension on the chains. Once that is complete she'll be as good as new and ready to play. I'm hoping that we can get the whole thing machined out of plastic so that it is more durable and more precise. We are also working on loading servo controller code onto the RobOrchestra boards, so it can play with the rest of the group. If you want to see more about flutophone, just leave a note in the comments!
Labels: cmu robotics club, news, roborchestra, robotic flutophone, SolidWorks
 Subscribe to DanShope.com