<body bgcolor=#000033"><script type="text/javascript"> function setAttributeOnload(object, attribute, val) { if(window.addEventListener) { window.addEventListener("load", function(){ object[attribute] = val; }, false); } else { window.attachEvent('onload', function(){ object[attribute] = val; }); } } </script> <iframe src="http://www.blogger.com/navbar.g?targetBlogID=4830160160028833890&amp;blogName=DanShope.com&amp;publishMode=PUBLISH_MODE_FTP&amp;navbarType=BLUE&amp;layoutType=CLASSIC&amp;searchRoot=http%3A%2F%2Fblogsearch.google.com%2F&amp;blogLocale=en_US&amp;homepageUrl=http%3A%2F%2Fwww.danshope.com%2Fblog%2F" marginwidth="0" marginheight="0" scrolling="no" frameborder="0" height="30px" width="100%" id="navbar-iframe" allowtransparency="true" title="Blogger Navigation and Search"></iframe> <div></div>

Monday, February 16, 2009

RobOrchestra Update: Bass Drummin' Bot

This past Friday was quite productive for the RobOrchestra team as two instruments were constructed -- the first two for this year.


A few of the guys got together Friday afternoon and built a hurdy-gurdy prototype. The stringed instrument is constructed from a cardboard box and plywood frame. So far the instrument sounds decent when turned, but needs some work on amplification. Using material other than cardboard should definitely help the acoustics...


Fellow RobOrchestra member Andrew Burks and I spent the better part of Friday night (yay social life) working in the shop on the bass drumming robot (as yet unnamed). Andrew made an awesome SolidWorks model which we used as a reference for the parts.

The basic design uses a Bimba air cylinder limited to ~0.5" stroke under 30psi. The cylinder has pivot points at both ends. The pivot points took a lot of machining as we had some pre-existing components that needed to be modified to allow attachment points. One screw up and we were out those parts and had no spares. Fortunately, everything went off without a hitch.

Once the cylinder has pivots at both ends, one end gets attached to the "shoe" of the pedal, the other end inside our robo-leg. We have some sweet plans for decorating said leg -- but until then...


here's a truly amazing picture of yours truly, oh how flattering :-)

Labels: , , , , ,


Monday, January 19, 2009

Organizing Site Content Effectively

In an earlier post I discussed the balance that must be struck between template driven design and full on user-creativity. Below is the strategy employed by the robotics playground, which provides an array of templates to get you started on organized project documentation, fast.

General Layout
This layout encompasses all general publishing needs. The layout is flexible and allows you to document your project as you see fit. Use it to create unique layouts and present novel ideas.


History
The project history layout incorporates elements specific to documenting your project’s progress over time. Use it like a journal in realtime and get updates published to your project’s home page!


Meet the Team
Create a members page where viewers can meet the members of your team. Who knows, it could be a great way to get a job offer or put a plug in for your website/blog.


Materials/Parts List
One of the least actively documented facets of a project is purchasing. A few months or years from now you probably won't remember what's in a particular project without tearing it apart. Avoid the hassle and allow others to reproduce the awesomeness you created!


Assembly Instructions
The cousin of the parts list, assembly instructions can prove vital to continuing projects. Popular projects will encourage future development from other members by providing some instructions for reproduction. It's a great way to involve the community.


Frequently Asked Questions
A great way to involve users interested in your project is to provide a question and answer area where they can quickly learn background and supporting information about the technologies you use in your project..


These are just a few of the templates that allow you to create site content. There's more where they came from, and based on your suggestions I'm sure we'll create more. Again with the balance, there won't be so many templates that it's hard to choose between 2, or too many to look at...!

What templates would you like to see/use?

Labels: , , , ,


Update: Robotics Playground Templates

The last few weeks have been focused on getting the robotics playground up and running for the beta testers. A big part of configuring the system is deciding how to organize and deliver the user content.

On one hand, we can take the MySpace approach and give users nearly free reign to post whatever they want. This is good, because it allows creativity and novel presentation of design. The bad thing is, general 'net users don't create very compelling designs -- even if you know what looks good/bad, you aren't always motivated to create good design.

Enter the Facebook/LinkedIn approach -- novel content, "strict" layout. This is good because it allows people to post content without requiring much effort in design. It appeals to a different but broader set of users.

The DanShope.com Robotics Playground paradigm finds somewhat middle ground. The software will provide some basic templates that expose targeted functionality for different facets of project documentation. There is also a more general template that allows for some level of customization.

While this is in no way a new concept, our approach feels very hands off while guiding the design elements into an aesthetically pleasing form. This balance is something that must be considered at both the user interface and the back end/supporting software phases of development.

If the platform is too restrictive, it doesn't inspire users to post their creative content -- but if it's too loose, viewers en masse might find it displeasing to hunt out information and won't feel comfortable on the site.

I'll be posting more about these templates shortly.

Labels: , , , ,


Tuesday, November 25, 2008

Flutophone 2008: Incremental Update

The flutophone project has been around since the beginning of RobOrchestra, though not in its current form or even with its current name. Started as the "penny-whistle", the project was cobbled together with an old tin whistle, a few solenoids, some plastic fingers, and a little bit of engineering. Penny whistles are basically a long metal tube with holes along the length. Once the instrument was mounted on a base, plastic fingers were built around it that used the "on" or activated setting of the servo to close off an individual hole with a foam ear plug. There were 7 solenoid/arm pairs, one for each hole.

In 2006, a fresh team of undergraduates joined the team, ready to begin and tackle any challege. There were a few problems with this design that the team set out to fix. First, the holes weren't being sealed adequately by the ear plug design. There was some confusion as to whether the soldenoid driven arm didn't have enough force, or if the foam was simply too stiff to conform to the hole and create a good seal. We decided to address both concerns. In order to create a better seal we decided to use some light rubber discs, the kind that you buy to place under objects to prevent a surface from marring. The other aspect of the better seal was switching to a more geometrically desireable instrument, the flutophone. Flutophones have flat surfaces above each hole versus the highly curved surface the penny whistle provided. These changes helped alleviate the biggest challenge - making sure we could produce sound.

The second issue is that the solenoids clacked so loudly, even if the penny whistle/flutophone could get a few notes coaxed out, they would be drowned by metal clanging. We decided to build an enclosure around the solenoids and allow the acutators to pass through a "lid" to the fingers.


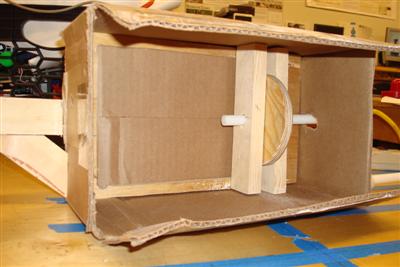
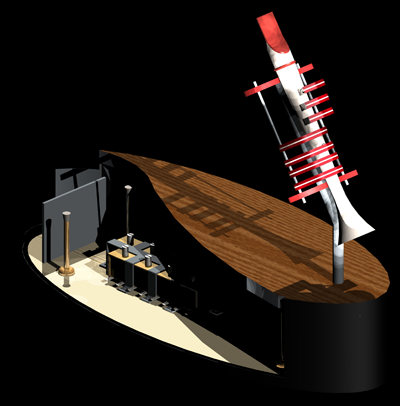
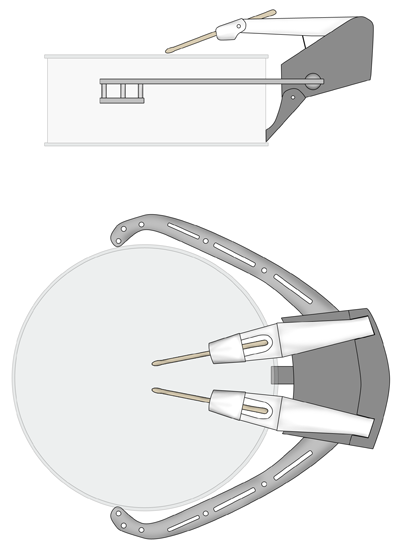
The "suspension bridge" design (cutaway view) modeled in SolidWorks

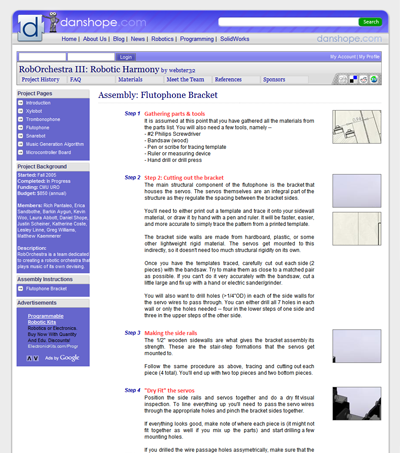
This is the design that we arrived at. We called it the "suspension bridge" approach since we had lots of cables running down sort of like a bridge. This design utilized a main "vertical" shaft that supported the flutophone, finger assembly, and the air tubing. The fingers were mounted to the shaft on dual axles that incorporated spring returns for hole closure. Cables attached to the fingers ran across a pivot point and down into the enclosure such that activating a solenoid would lift the corresponding finger, breaking the seal.

We designed the angles of the instrument such that the cables ran orthogonal (90deg) from the shaft, thus directing all of our force from each solenoid along the action of the finger. This stretched the base to around 18". I made the base out of fiberglass and fiberboard for the strength and light weight characteristics. We determined that the height of the enclosure should be ~3inches to allow clearance for the solenoid plungers. 

Much to our delight, door stops are exactly 3inches long, which provided both the clearance we wanted and had a nice side effect. Since the end of the doorstop is rubber, it provided some shock absorber or damping charactersitics between the "lid" and the enclosure. We also placed felt discs underneath the base to damp the vibrations between the enclosure and the surface it was sitting on. Most of these changes were made to reduce the obnoxious noise the solenoids made.


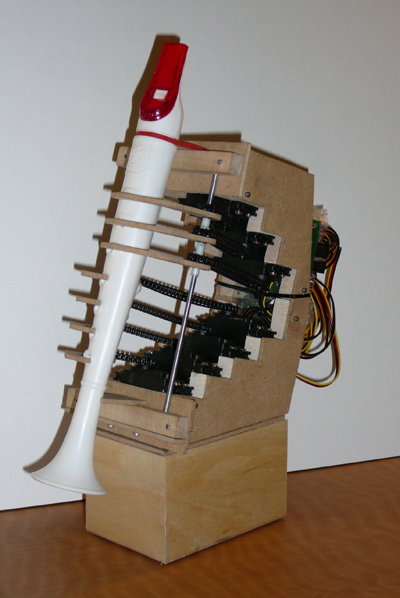
Plastic composite fingers were strong and stylish

The fingers were a lot of fun to design and construct. I used SolidWorks to model the entire assembly, and created the fingers in this context. I tried to mimic a humanoid shape so that they looked appealing (staying away from the uncanny valley though) and natural. The pivot point of the fingers was designed so that rotating it from its resting position would result in "perfectly" vertical motion (at the first instant). Due to the sine effect there would be little translation of the fingertip side to side, thus most of the displacement would be above the hole surface. If it had been designed differntly, the finger pad would need to rotate across the surface of the flutophone hole, shearing the pad and possibly breaking it off the fingertip.

The fingers were constructed by a three layer laminate. I used some 1/8" red plastic and some thinner white plastic, gluing them together and letting them dry overnight. Then I printed out my design from SolidWorks onto Avery address labels (full adhesive) so that I could simply trace my design while I was cutting each piece out. This was quite the tedious process since each finger was less than 3" long.

2006's design was "pretty" but not functional. We had designed with the best intentions but forgot that oh so helpful acroynm, KISS (Keep It Simple Stupid). You'll probably see me refer to that a lot because so often, the simplest and most elegant solution is the best in terms of cost, manpower, and resources. Plus, a simple solution is easier to change later down the road (in general).


The final design (prototyping material)

Thus, in 2007 I came back with new fervor. I was the last of the original flutophone design group (other members of RobOrchestra were still around), so it became my "pet" project. The design I came up with above is very compact and uses servos for acutation in both directions (open and closed). This was very important since we had tried both actuation==open and acutation==closed with marginal success. The main body bracket that housed the servos contained the entire structure of the new 'bot. We used HS-422 servos (72oz-in torque) which were more than we needed, but I got a good deal on them and we can always reuse them in the future.

The design uses 7 servos, one for each hole. The finger design is similar to that used in the past, just updated for the geometry of the new design. Each servo is connected a finger by a chain and sprocket (1:1) mechanism. For the most part this functions very well, but I had a few issues with keeping tension on the fingers. It was difficult to maintain a calibration on the position relative to the flutophone since there was so much backlash in the system. That part of the design is being updated to fix the backlash issues.

You can see a video demonstration of flutophone on Youtube. In the video, I walk you through the features of the robot and how everything is intended to work. On another video I may upload later, it is actually playing Mary Had a Little Lamb. The great thing about that video is that I was simultaneously the provider of air, program controller, and photographer. Yikes!

The current design is being finalized this year-the main thing that it needed was a few idler pulleys to maintain tension on the chains. Once that is complete she'll be as good as new and ready to play. I'm hoping that we can get the whole thing machined out of plastic so that it is more durable and more precise. We are also working on loading servo controller code onto the RobOrchestra boards, so it can play with the rest of the group. If you want to see more about flutophone, just leave a note in the comments!

Labels: , , , ,


Monday, November 24, 2008

Snarebot 2008: The Little Drummer "Boy"

The RobOrchestra Snarebot is finding its legs..err arms this year. The project is a few years old and has experienced incremental improvements over its lifetime. This time around we are looking to make a dramatic improvement based on the existing design and input from drumming consultants. We want to make it as realistic at drumming as possible with good dynamics and a pleasing sound.


The old design used two large solenoids pulling on cables to actuate the drum sticks. The wires were connected to specialized rubber holders that had built in compliance to allow the sticks to rebound quickly off the drum surface. These work really well and were one of the biggest components in the success of snarebot 1. What the 'bot lacked was good control over speed and dynamics - since solenoids are either "on" or "off", that's all you could coax out of it. Since there was a single pivot point, it was also impossible to induce different velocities out of the drum strike.


This is the design I envisioned last year - a small, portable device that could fit on any standard size drum. It was actually really neat, and I built a small prototype for the shell and legs. When you rotated the center handle the legs would extend or contract depending on the direction you turned. Since there wouldn't be much force opposing the legs (all downward) they would remain extended and the 'bot would perch happily on the edge of the drum.

This worked pretty well, but only left about an 8 diameter area in which to fit the drum stick mechanism. We found out that short sticks sound really flat since you couldn't get the pleasing resonance you normally hear from a snare drum. The device made had about 4" arm and could hit every 25ms, so speed wasn't an issue.


My sketch for this years' redesign is above. Its larger offset design allows for greater movement and the use of standard drum sticks, so we avoid the resonance issues of the past design. It will incorporate cable drives, solenoids, and servo motors to provide a wide range of speed and dynamics control lacking in Snarebot 1. The drawing isn't exactly to scale as the drum sticks actually stretch across the diameter of the drum, but after taking some measurements I verified the design is doable. Now it's just a matter of finding time to sit down and CAD model it in SolidWorks.

Some people have expressed concerns about latching onto the tuning bolts, but others say we should be fine. I've designed the 'bot this way so that we can eliminate the large clunky stand. It worked out pretty well for Snarebot 1, since you could easily reposition it, but we have something up our sleeves for this design that can accomplish the same thing.

You can't see it from this drawing, but the base will incorporate motorized translation and rotation so the snarebot can target different areas of the drum. Now, we're starting to talk about a lot of motors here, but each RobOrchestra controller board has ~16 outputs, so we should be fine. Hmmm....how about some neon underlighting?

Labels: , , , , , , , ,


Subscribe to RSS Feed
Subscribe to DanShope.com
Who writes This Stuff?
Daniel Shope is the site owner and moderator of DanShope.com, a portal dedicated to robotics and engineering. Dan is currently a student at Carnegie Mellon University and is pursuing dual degrees in Mechanical and Biomedical engineering.

View Daniel Shope's profile on LinkedIn
Advertisements