<body bgcolor=#000033"><script type="text/javascript"> function setAttributeOnload(object, attribute, val) { if(window.addEventListener) { window.addEventListener("load", function(){ object[attribute] = val; }, false); } else { window.attachEvent('onload', function(){ object[attribute] = val; }); } } </script> <iframe src="http://www.blogger.com/navbar.g?targetBlogID=4830160160028833890&amp;blogName=DanShope.com&amp;publishMode=PUBLISH_MODE_FTP&amp;navbarType=BLUE&amp;layoutType=CLASSIC&amp;searchRoot=http%3A%2F%2Fblogsearch.google.com%2F&amp;blogLocale=en_US&amp;homepageUrl=http%3A%2F%2Fwww.danshope.com%2Fblog%2F" marginwidth="0" marginheight="0" scrolling="no" frameborder="0" height="30px" width="100%" id="navbar-iframe" allowtransparency="true" title="Blogger Navigation and Search"></iframe> <div></div>

Thursday, November 5, 2009

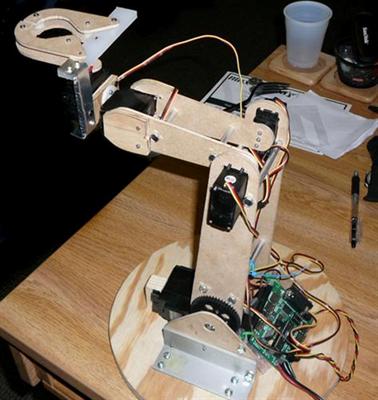
Designing & Testing Robots: Colony Scout

Colony Scout Updated Design
Between classes, eating, and sometimes sleeping I've been hard at work refining the Colony Scout robot. The core feature set has remained the same -- four wheel drive, rocker pivot platform powered by a lithium ion pack. The sensor package includes a front bumper, dual sonar rangefinders, battery level monitoring, localization beacons, xbee communications, wheel encoders, yaw gyroscope, and three axis accelerometer.

Shown here in green (one of many colors), the Scout now sports a vented enclosure for the electronics. RGB (multicolor) LED "headlights" shine out the front hood, which is magnetically clasped for easy access to the processing board.


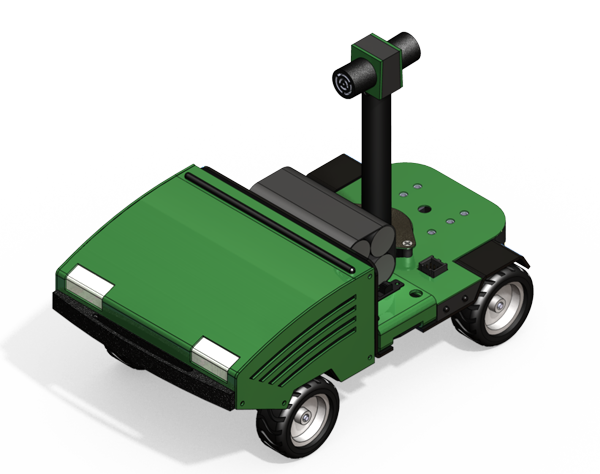
The team has been hard at work designing the Scout board, which runs an ARM9 core mated to an ATmega 128A as a coprocessor. The ARM9 does the heavy lifting but leaves the very important role of gathering sensor data and driving the motors to the lower powered AVR chip.

Board design is custom and includes components specific to the platform. We are looking into POE (power over ethernet), USB, and external charging to power the system.

Scout will run a Linux RTOS -- as yet to be decided. Linux brings a lot of functionality to the table but also has its own quirks that will be interesting during development and testing. We hope to have a first run dev board in testing by December.


Diagnostic Station
Testing and validating the robot design only goes as far as production. The diagnostic station aids the maintenance process over the lifetime of the robot(s).

I went for a pipelined design whereby tests are separated spatially to allow faster throughput with multiple robots. This results in an elongated testing platform, but it still measures in under a yard...so far :-)

Assuming the robot can navigate to the station, it will ascend the ramp and proceed through the three stages. All tests and robot maneuvers are controlled by the Colony server, which handles scheduling and task assignments for all the robots.


Stage 1: Chassis Dyno & rBOM Tester
The motors and encoders are tested across the speed range of the robot. A sequence of tests is also performed with loading on the dyno rollers. This simulates the robot driving across different terrains.

Stage 2: Cliff Bridge
Between the two larger stations, the bridge tests the three cliff sensors through several cycles (see ladder-like design). This comes after the encoders/motors are calibrated for straight line driving. We don't want robots to go splat during a maintenance run!

Stage 3: Gyro & Accelerometer Station
The final and most complex station latches onto the robot and spins it for gyro testing. Accelerometer tests are also performed by spinning and tilting the robot. I'm still designing the internal mechanisms -- should be interesting.

Dyno Station Mock up (who doesn't love Legos(R)?)

Other News
I've also been working on the design and function of the charging station. So far it's pretty sweet with a low profile, modular design. I'll try to post some renders and details up soon!


Labels: , , , , , , , ,


Monday, January 19, 2009

Update: Robotics Playground Templates

The last few weeks have been focused on getting the robotics playground up and running for the beta testers. A big part of configuring the system is deciding how to organize and deliver the user content.

On one hand, we can take the MySpace approach and give users nearly free reign to post whatever they want. This is good, because it allows creativity and novel presentation of design. The bad thing is, general 'net users don't create very compelling designs -- even if you know what looks good/bad, you aren't always motivated to create good design.

Enter the Facebook/LinkedIn approach -- novel content, "strict" layout. This is good because it allows people to post content without requiring much effort in design. It appeals to a different but broader set of users.

The DanShope.com Robotics Playground paradigm finds somewhat middle ground. The software will provide some basic templates that expose targeted functionality for different facets of project documentation. There is also a more general template that allows for some level of customization.

While this is in no way a new concept, our approach feels very hands off while guiding the design elements into an aesthetically pleasing form. This balance is something that must be considered at both the user interface and the back end/supporting software phases of development.

If the platform is too restrictive, it doesn't inspire users to post their creative content -- but if it's too loose, viewers en masse might find it displeasing to hunt out information and won't feel comfortable on the site.

I'll be posting more about these templates shortly.

Labels: , , , ,


Sunday, November 23, 2008

Creation of a robotic arm


This is the robotic arm I built to demonstrate at the Cub Scout meeting a few days ago. It's main construction material is hardboard -- sort of like clipboard material but a little bit more flexible. Ideally it would be built out of aluminum, but hardboard is very fast to shape and drill through, so in the interest of time it was chosen. The total project time was under 48 hours from start to finish, which also included sleeping, eating, and classes in the middle.


The main shoulder joint is driven by a Hitec HS-805BB servo, a real monster. I like this servo a lot because it can pretty much give whatever you ask from it. Stall torque is rated at 343oz-in and I also had a gear reduction on the shoulder joint that increased the torque by about 1.75x.


The elbow joint was a lot of fun because I chose to use two HS-311 servos in conjunction. This configuration provides stability for both sides of the joint and bumps up the maximum torque. Since I still had a lot of mass to control outset from the elbow the extra capacity was necessary. These servos produce around 42oz-in of stall torque, which was sufficient for this design. In the actual controller code the servos rotate in opposite directions, so I had to be concious of them trying to fight each other. Overall this joint performed the best and was super fast!


Here's a side view of the whole 'bot. The gripper mechanism is pretty neat but not functional. You can sort of deduce this from the one piece of aluminum sheet metal holding it on. I ran out of time to make it work well, but decided to attach it for asthetic purposes. The basic mechanism has a rotating cam that spreads the two fingers. The grip is supplied by spring returns on each finger. It also features a passive locking system on the cam when the fingers are completely closed.

The large gear on the shoulder joint gave me a lot of problems since it wasn't a very high quality part. The interface between the HS-805BB servo and the shoulder gear was difficult to maintain and the joint frequently slipped when it was moved too fast. In an attempt to maintain that joint better I added the large aluminum brackets you see here. They did help a lot, but still couldn't maintain the level of consistency I wanted from the arm. I plan on re-machining everything from aluminum when I build the snare-bot arm (similar design) for strength and precision.


You can see the press-fit bearings used at the shoulder joint. It was pretty epic putting precision bearings into fibrous hardboard material. They fit quite snug, looked pretty, but were totally over-engineered for this choice of construction material. You can also see the controller board here -- a Lynxmotion SSC32. This board is my favorite serial servo controller I've used so far with 32 outputs, daisy chaining capabilities, a wide range of baud rates, and a relatively compact footprint.

The controller board was connected by serial cable to a laptop running Windows and a serial servo controller program I wrote. This is the "kid" version of the software which has pre-scripted macros for cool demonstrations. I typically use a stripped down version of this program to run all of my 'bots that use the SSC-32. If you are interested in the board go to Lynxmotion and check it out. If you get or have the board and want the basic software (8 channel control and terminal window) send me an email!


Labels: , , ,


Friday, November 21, 2008

Just for starters...

So, I've taken the plunge; I am going to become a blogger. One more voice in the interweb wind.

This is a sister area of DanShope.com my personal site and the home of the robotics community that I host. I'll be posting updates about the site and how the development is going, as well as some helpful guides for starting robotics, using CAD software, learning FEA, and being an effective web developer.

If you have any suggestions for articles/posts you'd like to see written, feel free to contact me. I love getting mail about the site and can generally respond pretty quickly. In the mean time, head on over and check us out!

We've got great news about upcoming robotic technologies and medical robotics as well as other interesting engineering topics. The robotics playground community hasn't gone live yet, but I'm hoping to push out of the development phase and get released by the end of the year.

I'll keep you posted!

Labels: , ,


Subscribe to RSS Feed
Subscribe to DanShope.com
Who writes This Stuff?
Daniel Shope is the site owner and moderator of DanShope.com, a portal dedicated to robotics and engineering. Dan is currently a student at Carnegie Mellon University and is pursuing dual degrees in Mechanical and Biomedical engineering.

View Daniel Shope's profile on LinkedIn
Advertisements