<body bgcolor=#000033"><script type="text/javascript"> function setAttributeOnload(object, attribute, val) { if(window.addEventListener) { window.addEventListener("load", function(){ object[attribute] = val; }, false); } else { window.attachEvent('onload', function(){ object[attribute] = val; }); } } </script> <iframe src="http://www.blogger.com/navbar.g?targetBlogID=4830160160028833890&amp;blogName=DanShope.com&amp;publishMode=PUBLISH_MODE_FTP&amp;navbarType=BLUE&amp;layoutType=CLASSIC&amp;searchRoot=http%3A%2F%2Fblogsearch.google.com%2F&amp;blogLocale=en_US&amp;homepageUrl=http%3A%2F%2Fwww.danshope.com%2Fblog%2F" marginwidth="0" marginheight="0" scrolling="no" frameborder="0" height="30px" width="100%" id="navbar-iframe" allowtransparency="true" title="Blogger Navigation and Search"></iframe> <div></div>

Wednesday, June 24, 2009

Sharp IR Rangefinders and Arduino: Make your Robot Smarter

Adding distance or proximity sensors to your robot is a great way to start exploring your environment intelligently. Rangefinders allow a non-contact method of “seeing” obstacles and can be employed in mapping and maze solving as well.

The Sharp family of infrared (IR) rangefinders is very popular amongst hobby roboticists because they are low-cost and easy to interface with (Voltage, Ground, and Signal). These hook up to a single analog input pin on the Arduino or similar microcontroller systems. There are a few caveats to watch out for though.

If your application is very time sensitive and needs tightly controlled, you’ll want to find out how long polling your sensor(s) takes. The Sharp sensors output an analog value (as a voltage), but microcontrollers only understand digital values (1 or 0), so that analog value has to be converted. Analog to digital conversion is pretty fast, but it can introduce some delays.

The sensors are also very noisy, meaning the analog output signal has a lot of "jitter" -- 20cm does not always equal 280, etc. Your code will have to account for this jitter, so you'll need to collect some real-world values to build your sensor model. This problem is exacerbated by the next issue, but can be overcome with a little bit of thought and time. I don't provide you the solution here because it's really dependent on your application. There is, however, a tool to help you evaluate your sensors (see below).

Moving on, take a look at this graph:

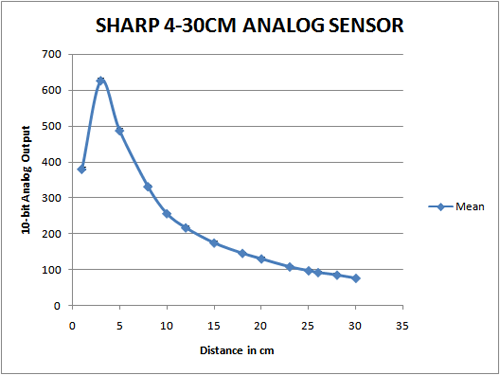
You’ll notice something interesting here – the graph has a weird curve and isn’t linear at all. This becomes tricky when trying to teach the robot to understand distance from the analog output of the sensor.

There are a few ways to get around this. If all you want is a simple threshold say “nothing closer than 20cm” then you can simply run a few tests with an object placed 20cm away from the sensor, and then hardcode that value into your program. Generally it’s a bit more complicated, if you want the program to understand varying distance.

Method 1:
Approach: Find a best-fit curve (generally exponential or polynomial) using a statistics package (Excel, R, Minitab)
Pros: Easy to implement, gets you started fast.
Cons: Requires floating point math, which isn’t natively supported by most microcontrollers. You can still use floating point, but it’s slow and inefficient in most cases.

Method 2:
Approach: Gather some data points and create a look up table of values. Your code will linearly interpolate values between each data point (ie, 5cm=600, 10cm=300, etc).
Pros: Uses integer math which is fast and efficient
Cons: Takes up more memory and doesn’t give exact values

Method 2 is the preferred approach as most embedded system developers take great pains to avoid floating point math. You can have some floating point math on the Arduino and be alright. I have a large (6KB) program right now that has floating point littered all over the place (it’s necessary for this code) and execution time runs just fine.

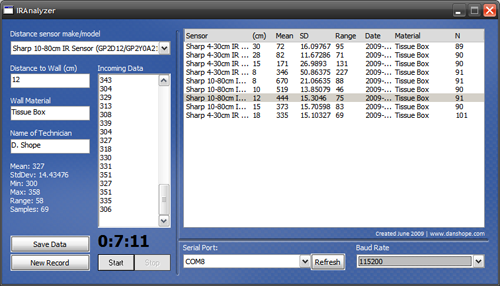
To help with gathering your data for both method 2 and simple thresholding I wrote a quick little application that interfaces with the Arduino’s serial connection. This app will pull your data in and calculate some basic statistics such as standard deviation, mean average, and range of values. You can store the data for future computation and reference.

Download the IRanalzyer at http://www.danshope.com/calton/ir.html

To use the IRanalyzer you need to send values from the Arduino. Here’s a sample sketch to get you started:


#define SerialSpeed 115200 //typical values are 9600 or 115200
#define SampFrequency 10 //sampling frequency in Hz (cycles per second)
#define AnalogPIN 0 //define your pin here

int mDelay;

void setup()
{
Serial.begin(SerialSpeed);
mDelay = 1000/SampFrequency; //calculate delay for proper sampling rate
}

void loop()
{
delay(mDelay); //delay in milliseconds
Serial.println( analogRead(AnalogPIN) ); //reads the analog port and prints value over serial
}

Labels: , , , , , , , , , , , ,


Sunday, November 30, 2008

SolidWorks Lesson 1.4: Sweeps, Assemblies, & Mates (Yo-Yo String)

Last time we created a yo-yo body and learned how to use rotational extrusions and mirrored sketches.  In this lesson we'll learn how sweeps work, start using assemblies, and learn about the SolidWorks assembly attachments called "mates". At the end we'll have a functional yo-yo...well, sort of! Let's get started!

  1. Create a new document, and choose the Right plane to start your sketch.


  2. Draw a horizontal straight line about 2” long (start at the origin)
  3. Select the spline tool. Click on the end of your last line, and draw a loop.
    1. You may need to play around with this a little since you don’t want your loop to overlap itself at all
    2. We need smooth curvature, so be sure not to make any “sharp” bends


  4. Now selecting the Front plane, start a new sketch. You will need to rotate the view manually either by clicking with the center mouse wheel and dragging across the window, or by using the standard view buttons.
  5. Select the circle tool and sketch a small circle at the origin.
    1. If you created the other lines properly, this should be centered on the straight line.
  6. Dimension this circle with a 0.0625” (1/16”) diameter using the “smart dimensions” tool.


  7. Now click the Sweep/Swept feature button on the Features Toolbar.


  8. Your profile is the circle; your path is the line.
    1. You might see how this could be useful for making complex paths
    2. Feel free to play with this feature when you have some free time!


  9. If you get an error message and SW doesn’t let you create the sweep, there might be something wrong with your model.
    1. Make sure that the circle we are “sweeping” over the long profile is significantly smaller than the line. If the 3D solid will intersect itself because the loop is too small or the circle too large, SW will give you an error message
    2. There may be a sharp angle between the straight line and the loop. To fix this, simply apply a large sketch fillet to the first sketch, say, ½ to 1” radius.
  10. If you went through the yo-yo tutorial, you should now we have a yo-yo string and a body, but they’re in separate documents. We create a SolidWorks assembly document to put our pieces together.


  11. Create a new Assembly document (File, New, Assembly).
  12. Using the “Insert Components” dialog (replaces the property manager), select your yo-yo body or using the browse dialog locate and insert this.
    1. The first part you insert into an assembly will be the “origin”. If you delete this origin part and insert parts later, the assembly will NOT be constrained in 3D space, a big problem for FEA or any physical simulations.
  13. We will use the concept of mates—creating relationships between the parts using the geometry we have created.
    1. For this step we will use a less-useful mate, the “tangent” mate to fix our string to the inner radius of the yoyo.
  14. Not completely constrained, but it will work for this non-functional model (prop)
  15. Your yo-yo is complete!

Labels: , , , , , ,


Saturday, November 29, 2008

The 8 Step Guide to Starting & Marketing Your Website

Perhaps you've been browsing the web lately and thought about starting your own site. You might have something you want to share with the world, or just want to show off your work. There's also the lucrative prospect of marketing your product via the web. A lot of beginner's guides out there only talk about how to pick out a website template and neglect to tell you about how to market your site and scams to watch out for. The 8 step guide is designed to get your site a good footing and help you build on this solid foundation. Post any remaining questions in the comments!

  1. Set a Clear Goal.
    The first order of business is having a clear goal for your site. Who is your target audience, and what are you trying to "sell" to them? Whether you're actually selling a product or not, you are marketing your site to build up readership. If you don't offer something of value to your customers, they won't have a reason to come back. Try to find compelling content that is in line with your company or focus and that your viewers will appreciate.

  2. Custom or Pre-fabbed?
    Once you have a focus for your site, you'll want to start thinking about how you will present this content to your viewers. Should you get your own domain (web address) and start from scratch, or would blogging software (Blogger, WordPress, MoveableType, LiveJournal, Xanga) better suit your needs? Blogs are great because you can be up and running literally in minutes. A custom site takes more work but can be very rewarding in the long term. No matter what course you decide to take, make sure that you can supply your site with the time and care it needs to maintain fresh content and get recognized by search engines.

    If you're going the custom route, you will need both a domain name and hosting. The domain name should be a (.com,.org,.edu,.biz) based on your needs. In my experience it's best to start with a .COM unless you are an organization, in which case .ORG will resonate with your viewers better. Most people will try .COM by default if they forget the full website address, so it might be good to have this domain registered anyway. Hosting just means where your pages will be stored and people can access them from. Potential viewers will type in your website address, get pointed to your domain, and a page request will be made. There's a lot of mixed reviews out there, but some good companies for both hosting and domain purchasing are GoDaddy.com, IPower.com, and Register.com.

  3. Research SEO.
    Before you open your site do some research on SEO or Search Engine Optimization. SEO is a science in its own right; trying to figure out how the big search engines work is a full time job. Luckily for you numerous companies, such as HubSpot.com and PepperJam, have sprung up in recent years and specialize in this topic. You can rely on their expertise to fashion your website into a robust marketing tool. You can also find books at your local library or book retailer focused on SEO. These can be an invaluable resource in marketing your website to the masses.

  4. Designing your site.
    If you're starting a custom site it might be useful to hire a graphics designer or find someone with an art and publications background. You want to organize your layouts in a manner that is optimized for the content that is the most important to your viewers. Later we'll discuss in more detail how to determine the optimal layout for your site based on your long term goals.

    A great way to start thinking about your site's design is to keep a list of websites that you like in terms of style and layout. Start constructing a color palette that will compose your site. You can hand these to your designer to help streamline the design process. If you're doing the work yourself, you'll have some choice references to work from. I even like to take screenshots of the sites I like and keep a folder of designs styled to my liking. When I need to do a new layout or refresh the site's look, I'll pull out my portfolio of resources which saves a lot of time and doesn't require me to revisit the sites. This is especially helpful if the site's layout changes in the meantime, or if the site becomes unavailable.

  5. Creating your site layout.
    Once you've determined the niche your site will fulfill, and have an idea of the colors and some graphics you like, you are ready to optimize your page layout(s). Start by listing the different elements of your site for a given page. You might have a list like the following:

    Logo
    News & Updates
    Testimonials/Quotes
    Banner Ad
    Weekly Blurb
    Blog Posts
    Footer

    You should rank these by importance and give each a weight (out of 100%). Do a little research about what users look at on websites. A great study is eye-gaze tracking, which is widely used by marketers to create better targeted layouts. I could try to give you the perfect recipe here, but the fact is layouts can be different for every site and you should expect to do some research when creating your site. Website design and maintenance is a time-consuming but fun process that will pay off in the end. The next phase is called "wire-framing" where you create box layouts for each element of your site we listed above. The placement of these boxes should be determined by the ranking you set for each of your elements. Read this great article about wire framing pages and creating site flowcharts. If you're looking for something more radical, this article from Usability Post has some great graphics examples and a guide to "breaking out of the box." There are other great, comprehensive guides out there, just do a search for "how to start a website" or "creating my website".

  6. Bringing the Design to Life.
    Now that you have your website design, you'll want to start building the code behind your site. The designer should have a solid understanding of HTML, CSS, Javascript, and PHP, CGI, SQL for more advanced dynamically driven sites. If you're using blogging software, consult the documentation for your particular vendor. You can find well-designed templates online or design your own, but you must use the proper markup for your vendor.

  7. Testing and Validation.
    Before you put your site online, TEST TEST TEST. Test it from all the major browsers (Internet Explorer 6/7/8, Firefox, Safari, Opera) as well as clicking on all the links to make sure they work. If you are using forms on your site, walk through the entire process of submitting a form. If users are signing up for accounts, make sure you have code that tests against duplicate usernames and invalid passwords, or expired validation links if you're sending out confirmation emails. When your site goes live, everything should "just work." Remember that whole thing about first impressions? Yep, it applies here big time. Don't rely on your visitors coming back if they have a bad experience the first time around. In fact, studies have shown that users browsing the web make a decision on any given site (whether to stay or go) within seconds of loading.

  8. Marketing your website.
    The worst thing you could do at this point is forget to market your website. No, I'm not talking about spending thousands of dollars on your local radio station ads, or doing some fancy-schmancy TV ad. Those are all well and good but there are some much easier and less-costly ways to get your site noticed. One of the best things you can do is social networking. This buzz word just means get out and establish an online identity that people will recognize. Get on Facebook, LinkedIn, ZoomInfo, StumbleUpon, Digg, Delicious, and all those other Web 2.0 sites and start posting. Now, DON'T do link spamming or any other nefarious method of getting links to your site. The point here is to intrigue people enough about "who is this guy?" that they go to your profile and click on the link to your site. Also, people WILL start to notice frequent posters across various domains. Just be sure not to give out any personally identifiable information as ID theft is a real issue here.

    Be wary of linking schemes and sites that advertise "google-bombing" and other means to instantly propel your site to the top of the search ranks. The truth is getting your site recognized takes time, but the legitimate links you establish will outlast and out value any artificially elevated search engine trickery. Also, you risk removal from Google's index if you are found to participate in these schemes.

Conclusion
So let's recap! You should find a focus or niche for your site, design what type of hosting you want to use, and go about designing your website in a way that will be robust and extensible in the future. Once you have your design on paper, start turning it into useable markup language and test it out on a secure area of your site. Once you're ready, publish your site and start marketing! You're on the way to success.

Update: I just read a great post from ProBlogger about starting out your blog with great content and how to market yourself. Head on over to ProBlogger for a useful read!

Labels: , , ,


Subscribe to RSS Feed
Subscribe to DanShope.com
Who writes This Stuff?
Daniel Shope is the site owner and moderator of DanShope.com, a portal dedicated to robotics and engineering. Dan is currently a student at Carnegie Mellon University and is pursuing dual degrees in Mechanical and Biomedical engineering.

View Daniel Shope's profile on LinkedIn
Advertisements